Working with Comets
This tutorial aims at addressing a periodically recurring topic, which is the processing of comet images. It will show you how to make still images, aligned on stars and/or the comet itself, simple animations or more complex animations using superstacking. All of this with photometric calibration applied to all the images so that the colours are accurately balanced.
Still images #
We will start this tutorial with a sequence of calibrated lights. If you need to learn how to do this, you can refer to the manual preprocessing
tutorial or the script preprocessing
tutorial. Unless you have changed the defaults, the sequence should be named pp_light_.seq. If need be, you could also proceed with per-sub background extraction
on your sequence before starting this tutorial, in which case, you would be using a sequence named bkg_pp_light_.seq.
Note: the input sequence should be made of fits individual images, not SER nor FITSEQ, in order to apply the color balance.
The basics of comet processing is to:
- align the sequence on stars
- align the sequence on the comet
- stack still images, either stars-bound or comet-bound.
- mix the two stacks (outside of Siril)
Select a good reference #
This is a crucial step as it will determine the final framing of your images. It will depend on your focal length, if your were using a tracking mount and the comet has passed through the field, on how the comet fills or not the field of view, etc … Pick the frame where the position of the comet is as you would want it to be in the final image. If your mount is not tracking, you will probably want to choose a frame towards the middle of the session so that you can maximize the overlap with all the other images of the sequence.
You can review all the images using the frame selector. Once you have made your choice, select it as the reference for the sequence and write down its number.
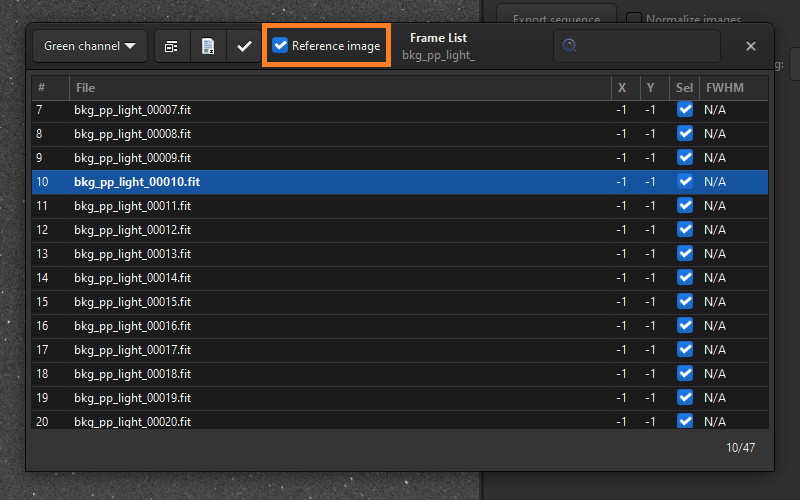
Highlight the image and tick the box Reference image. In the example above, frame #10 is selected.
Calibrate the colors of your reference image #
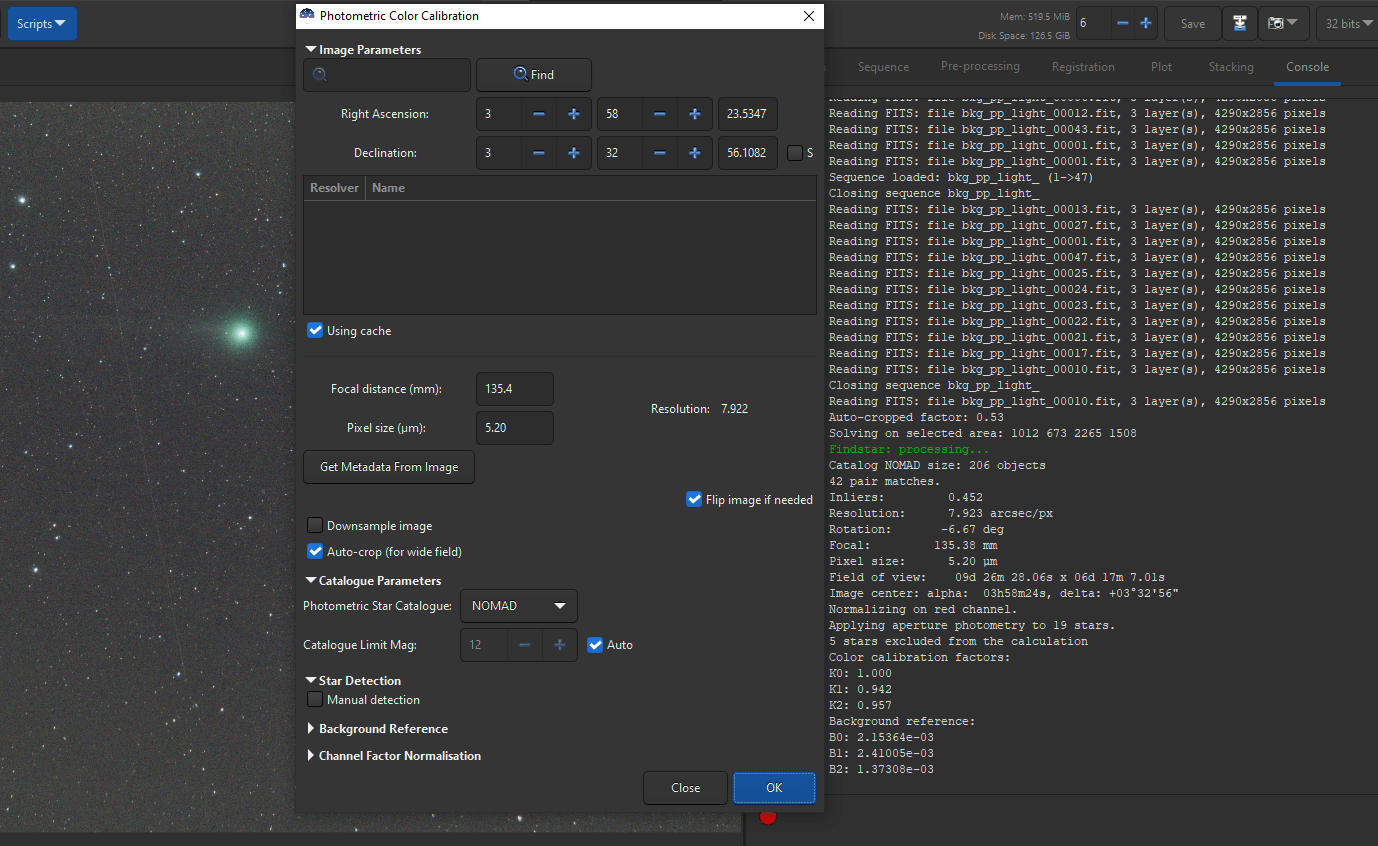
Now this is something you would not normally do at this stage, but this is how we will get the colors right for the comet-bound stack and for the animations. Open the reference image alone (not as part of the sequence). On our example, we have chosen bkg_pp_light_00010.fit. You can do this through the UI (Open button) or by typing load bkg_pp_light_00010.fit in the command line.
Open the Calibrate the image with photometry to reveal the beautiful green tint around the nucleus.Tools Menu, then Astrometry and Image Plate Solver. Plate-solve the image.
Open the Image Processing Menu, then Color Calibration and Photometric Color Calibration. Once calibrated, do not forget to save the changes, either through the UI (Save button) or by typing save bkg_pp_light_00010.fit in the command line. This will overwrite the existing image, which is what we want.
Global alignment and stacking #
Reload the sequence. It should open on the color-balanced reference image. If that is not the case, either you have calibrated the wrong image or you have forgotten to save your changes. Do not go any further before you get this right. Now go to the Registration tab. Align the sequence with Global Star Alignment (Deep-sky).
At the end of the registration step, Siril will normally pick the image with the lowest FWHM as a new reference image. While this is valid for the general case, we want to force using our own ref image. So re-open the frame selector and set again your own reference.
Go the Stacking tab and select the rejection alogrithm Windsorized Sigma Clipping. You may lower the sigmas, in particular the high sigma to reject as much as possible the comet. Most importantly, select the normalisation as Additive with scaling, as this will do the trick for the color. Do not tick the Output normalization box. Stack your images. The stacked image should be color-balanced as all the frames have been normalized to match the reference image.
It could be that you cannot remove all of the comet, in particular if it has not moved that much throughout your session. It will be further removed during the composition with the comet-bound stack.
Prepare for Global (star-fixed) animation #
One last step if you wish to do an animation, with stars fixed and the comet moving (you must do it before proceeding to aligning on the comet):
-
Go to the
Sequencetab. -
Reload the registered sequence
-
If you wish to have a specific output size, use the command
boxselect.For instance, I would like to have a square animation of 1600x1600 (keeping a multiple of 32 is usually a good idea). I can type
boxselect 0 0 1600 1600in the command line, which will draw a box of the desired size in the top left corner. I can then drag the selection where I want. I choose to position it with the comet roughly one third from the right border to keep a good portion of the tail. If I want to know the final box position for future use, typing againboxselectwill display its position [x y width height] in theConsoletab. -
In the export part of the
Sequencetab, type a name for the output sequence. Here, we will useglobal. Tick theNormalize imagesbox, selectFITSand press theExport Sequencebutton. This will apply at once the crop (thanks to the drawn selection) and the color balance of the reference image (thanks to normalization) to the whole sequence.
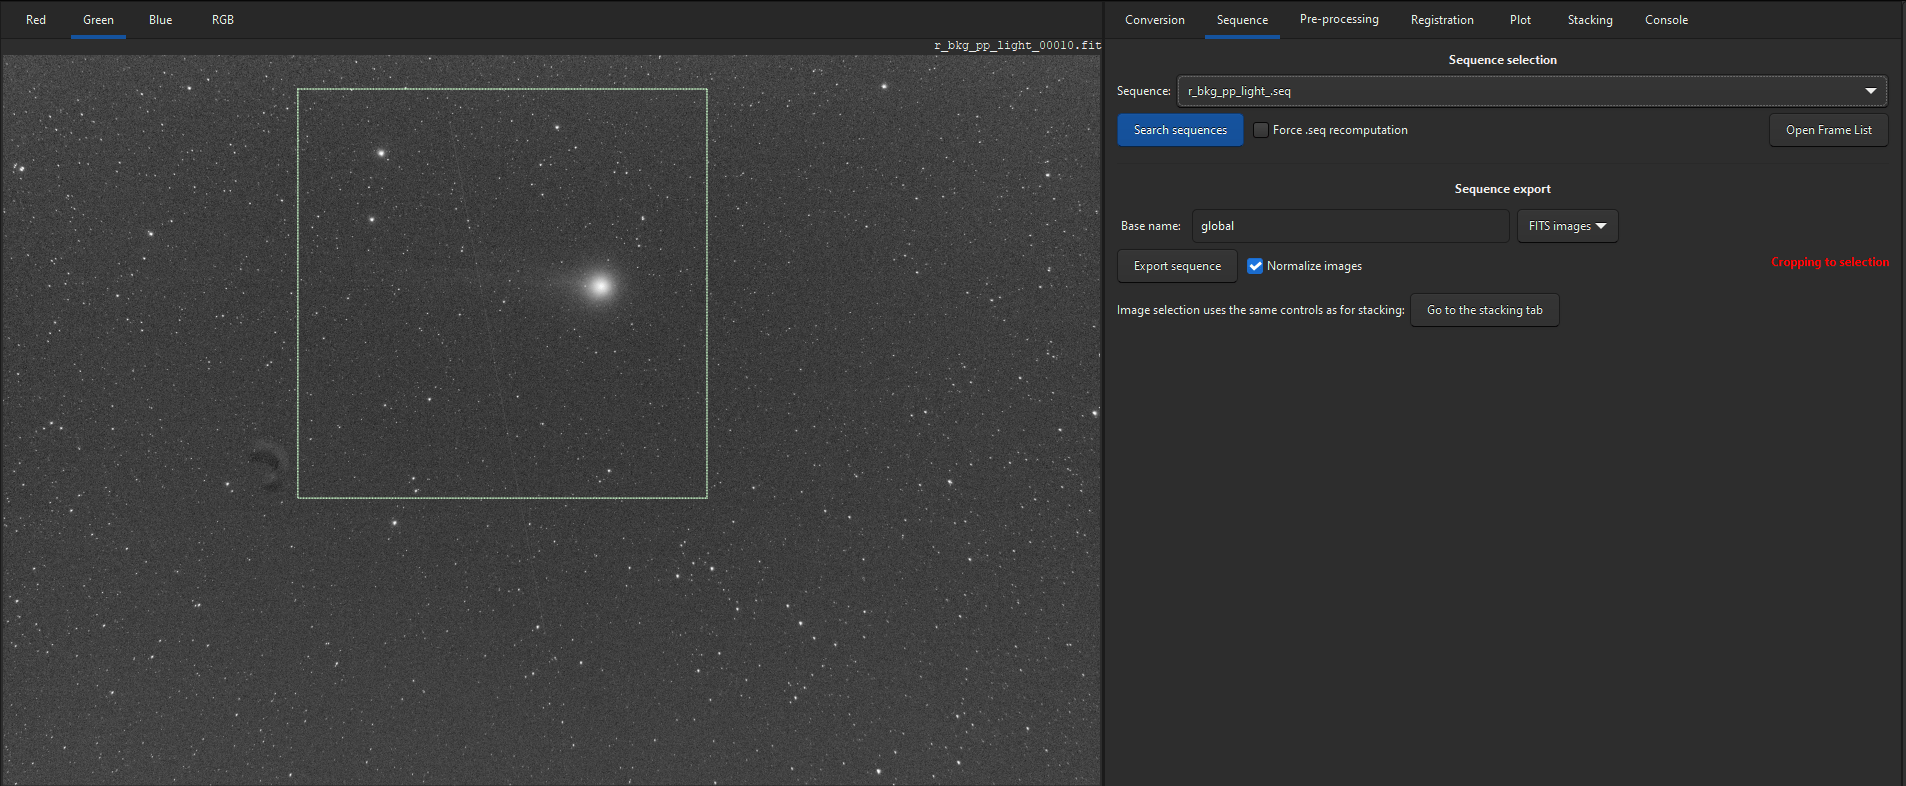
Draw a selection on your image and export the sequence with normalization active, to apply the ref image color balance to all the frames.
If you open the global_ sequence, you will see that all the images are color-balanced.
Comet alignment and stacking #
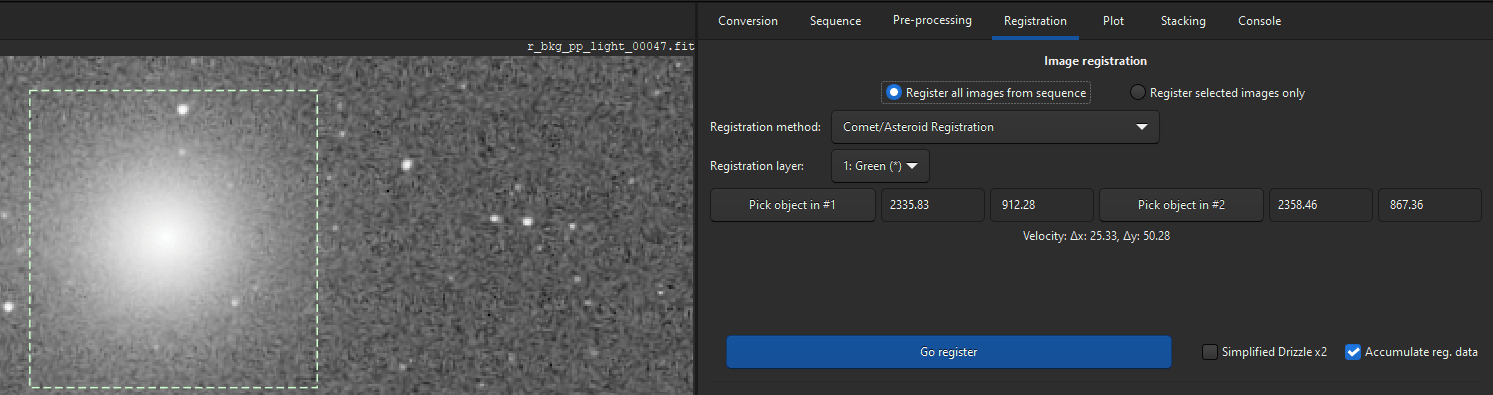
We will now align the sequence on the comet:
- Load again the registered sequence
r(_bkg)_pp_light_and go to theRegistrationtab. - Select
Comet/Asteroid Registrationmethod. - Use the frame selector to load the first image of the sequence.
- Draw a selection around the comet and click
Pick object in #1. - Use the frame selector to load the last image of the sequence.
- Draw a selection around the comet and click
Pick object in #2.
At the end of this process, Siril should display a velocity vector in X and Y. Click on Pick the comet in the first and last image of the sequence to create a new .seq file with comet registration data.Register.
- Go to the
Stackingtab. - Select
Additive with scalingfor the normalization method. - Select
Windsorized Sigma Clippingfor rejection algorithm. You can try different sigma values. Lower values will reject more pixels and remove more star trails (with probably more noise) while higher values will lower the noise but may keep more visible star trails. - Remember to change the name of the stacked image for every setting test you make with sigmas. Otherwise, images will be overwritten.
Close-up view of the comet stack with sigma hi/lo=1 Close-up view of the comet stack with sigma hi/lo=3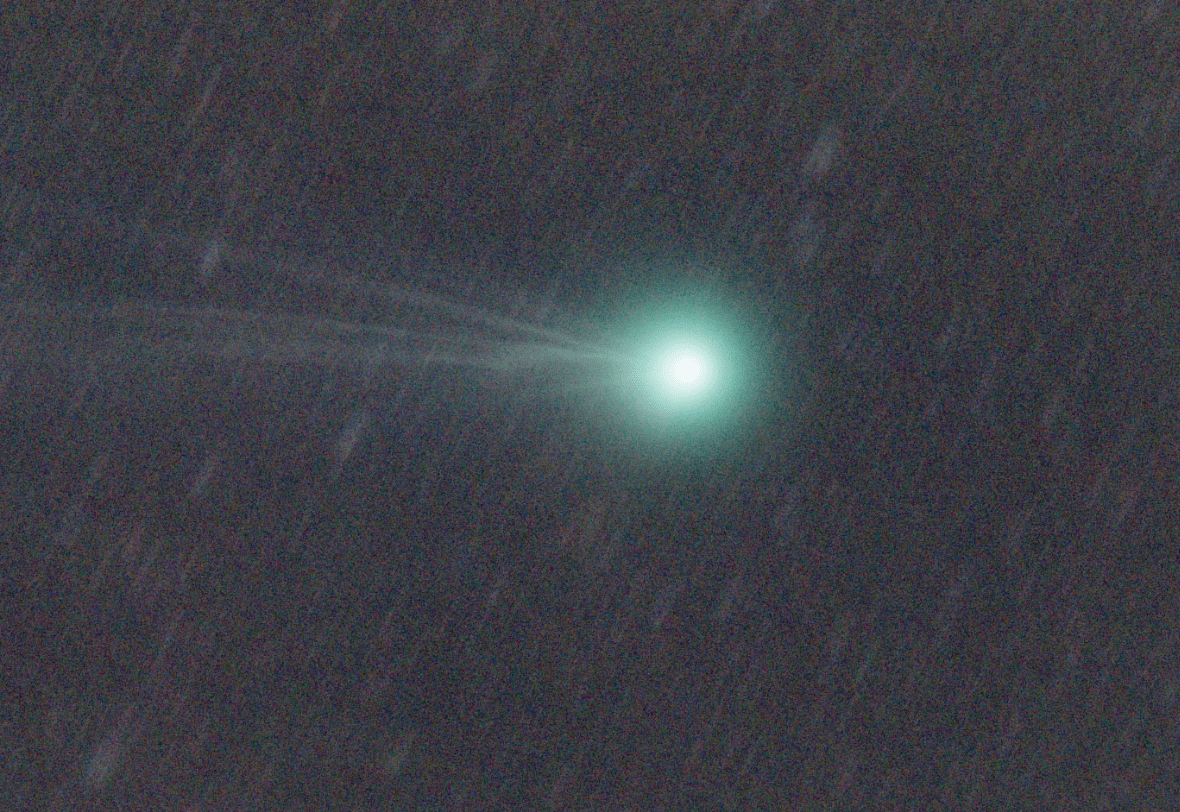
The image with higher sigma shows more details in the comet tail but also more star trails. Both images have a good color balance.
Prepare for Comet (-fixed) animation #
One last step if you wish to do an animation, with comet fixed and the stars moving:
-
Go to the
Sequencetab. -
Reload the registered sequence.
-
If you wish to have a specific output size, use the command
boxselect.If you have written down the selection for the stars-fixed export , you could use the same position to reproduce the same framing. For instance, it I type the command
boxselect 1153 133 1600 1600, the active selection matches the selection previously done to export the sequenceglobal_. -
In the export part of the
Sequencetab, type a name for the output sequence. Here, we will usecomet. Tick theNormalize imagesbox, selectFITSand press theExport Sequencebutton.
If you open the comet_ sequence, you will see that all the images are color-balanced.
Combine global- and comet-bound images #
You may wish to combine the 2 still images together. Before going to your favorite image editing tool (GIMP in my case), there are still a few steps you can make in Siril:
- In the
Converttab, load the stars-fixed and comet-fixed stacks. - Convert them to a sequence, say,
globalcomet - On the first image, draw a selection which removes all the unwanted parts of the image.
- Right click and select
Crop Sequence... - Now switch to
Linearpreview mode and make sure the top slider is set to 65535. - Open the
Histogram Transformtool. - Move the
ShadowsandMidtonessliders to the desired level of stretch. - Tick the
Apply to sequencebox at the bottom. - You will have 2 images, matched in levels and stretched to compose your final image.
This last paragraph ends the still images section of this tutorial. Now let’s head to the animation part.
Animations #
To be honest, when you have reached this step, most of the hard work has already been done. The only steps that remain is strecthing the images and exporting a video.
We will see how it works on the global_ sequence exported there
, but the same can be applied on the comet_ sequence exported here
:
- Load the
global_sequence inSequencetab. - If not already the case, switch to
Linearpreview mode and make sure the top slider is set to 65535. - Open the
Histogram Transformtool - Move the
ShadowsandMidtonessliders to the desired level of stretch. - Tick the
Apply to sequencebox at the bottom.
You now have a stretched sequence, mtf_global_, with all frames matched in colors, levels and stretch.
In the Sequence tab, you can export a video:
- Select one of the video export format (uncompressed AVI, MP4(H264/5) or WEBM)
- Set the desired quality and FPS.
- You can untick the
Normalize imagesbox, it is not necessary anymore and it will fasten the process. - Click
Export sequence.
You can follow the same process with the comet_ sequence (stretch and export):
If you wish to rework the images before creating the animation, you can, of course, export the sequence as a series of TIFF images and batch process them. I personnaly also like to export them as a SER file, tweak the saturation with SER Player and re-export a video from there.
Animations with superstacking (new sirilpy script) #
This section shows how to make multiple “sliding” stacks, termed “superstacks” hereafter, to enhance cometary details and reduce noise in your animations. Not all datasets will come out right with this technique. It suits well sessions with little star motions between each frame, which depends in turn of the focal length, the exposure time of each frame and the apparent speed of the comet in the sky.
To illustrate the principle, let’s assume we have shot 20 frames on the comet and reviewed the comet-fixed frames from here to inspect the stars motion from frame to frame. And the amount of star displacement is slow enough to group the subs 3 by 3. We would therefore want to automate this sliding stack process to:
- select each group of contiguous 3 frames.
- stack this group.
- move by one frame and do it again.
Until we reach the end of the sequence. This is illustrated below:
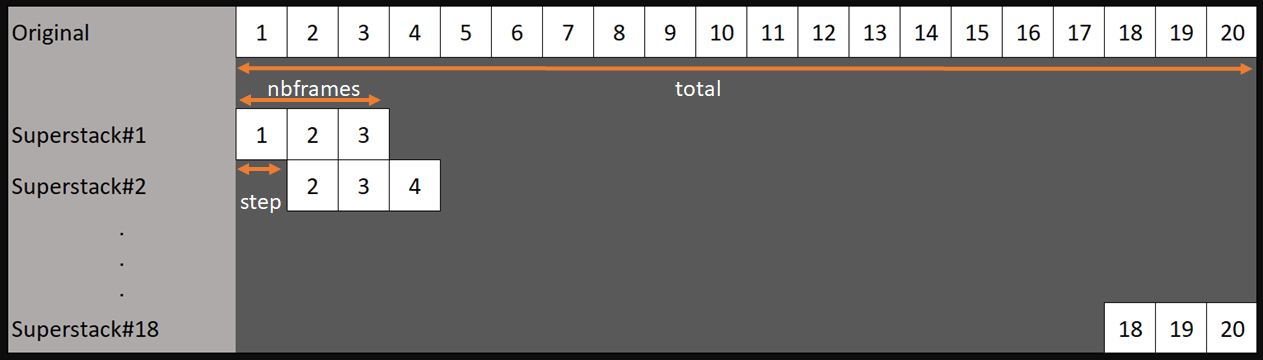
Superstack principle, with total=20, nbframes=3 and step=1
For longer series with less motions, we could decide to superstack by group of 10 images with a step of 5 between each superstack. That will really depend on the data you have at hand and the processing time you are ready to spend.
We could also decide to apply the same process on the star-fixed sequence.
In practice, this is easily scripted using sirilpy API
. As of Siril 1.4RC1 release, such script can be downloaded to siril directly
, search for SuperStack.py in the Utility category.
Once installed you can launch a GUI via the Scripts menu or use the cli version with the command pyscript SuperStack.py.
Remember to open the sequence you want to process before launching the script. It should be a sequence with registration already applied.
You can choose to normalize the sequence before actually performing the sliding stacking, in which case, it will create an additional sequence with the prefix norm_.
If you want to check how many images it will output based on number of images per sliding stack and step, you can tick the option dryrun.
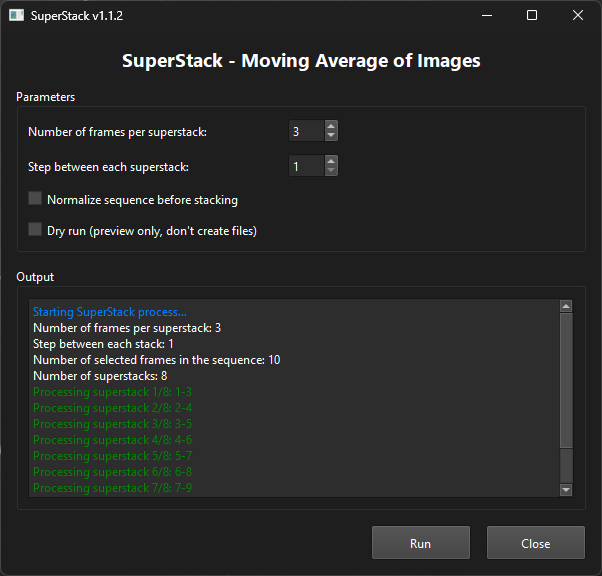
SuperStack script GUI
Once you click Run, the script will go on normalizing the sequence if activated and then creating the superstack images. The new images are located in the same folder as the original sequence with superstack_N_S_[norm_] prepended (N and S, the number of frames per stack and step between stacks respectively). You can try again with different settings to figure out the best option for your data.
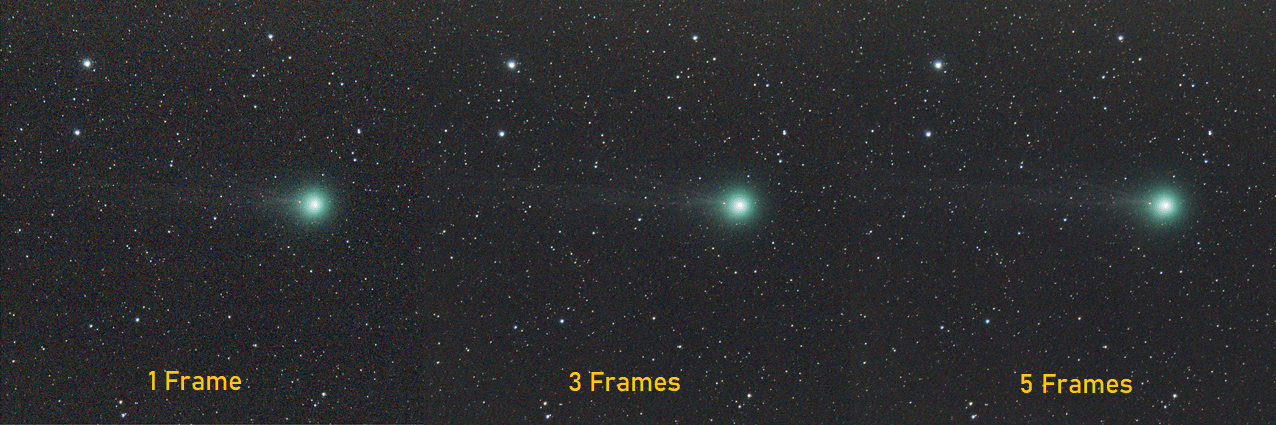
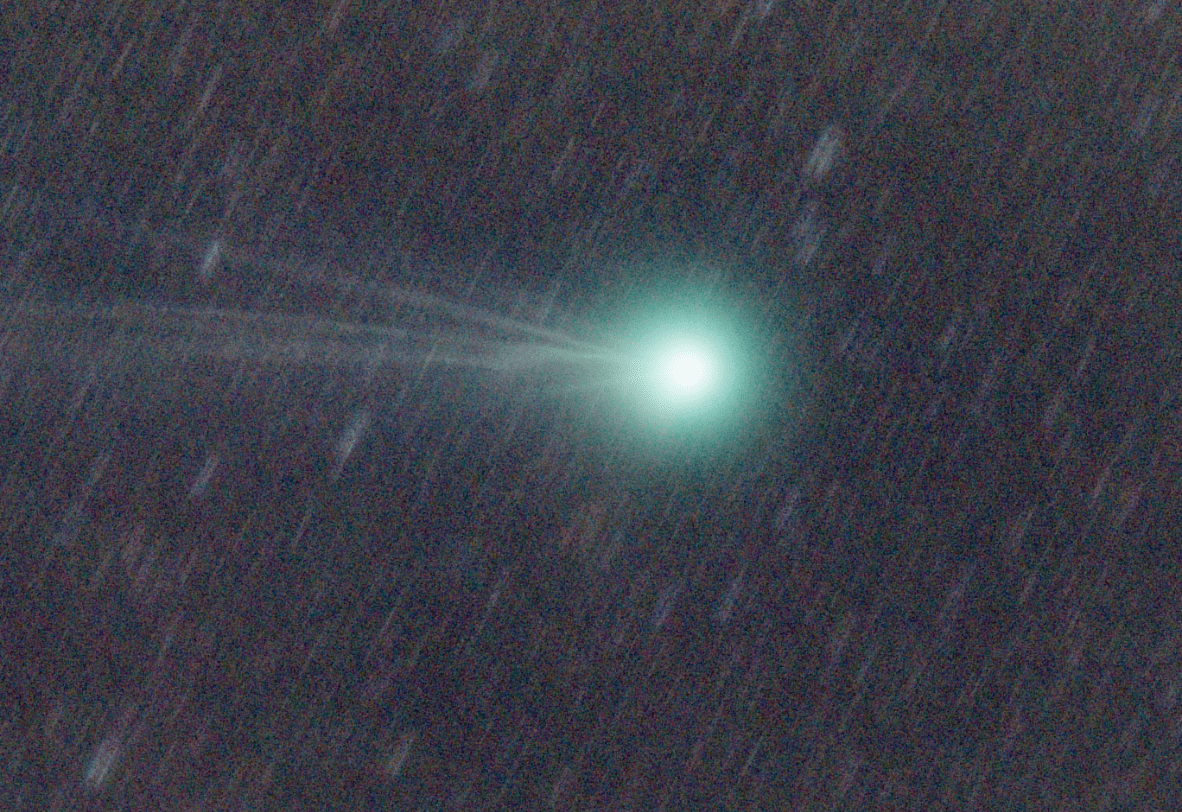
Effect of superstacking 3 and 5 frames
Once superstacking is completed, the newly created sequence opens up automatically. You can then proceed with this new sequence exactly as described in the animation section. That is to say strecth and export a video.
This animation below is the same as shown above, but with superstacking by 3 the original data.
And again with superstacking by groups of 10. This may be a bit extreme as the stars start having an elongated shape, which gives a fuzzier look to the overall result.
Finally, the same process has been applied to the “star” of a few years back, C/2021 A1, aka Comet Leonard. This is the result of superstacking by 10, on a star-fixed sequence.
Now, you have the tools to experiment with your own set of data. Enjoy!
Credits: All images used above courtesy of C. Richard. 47x60s frames on C/2014 Q2 (Jan 2015), except data to generate last video, courtesy of R. Ferrieri, aka @Umberto113 , 184x30s on C/2021 A1 (Dec 2021).