FAQ
Usage questions #
I don’t have flats, how can I use scripts? #
Official scripts are made to process images in the best way, which assumes that you have dark, flat and flat-dark images. If you have different or less files, you will have to either modify the script (see below) or find one that has already fits your needs in the dedicated page or somewhere else.
How can I combine different exposures on the same object? #
For some of the brightest objects like M42, M31 or even M13, you might be tempted to use several exposures. This allows you to have an unsaturated version of the bright part in the short exposures and still retain the details only seen in long exposures. How to process all this? Each sequence of image with a given exposure should be treated as a different session (see how to process different sessions belowf): you will get as many stacked images as different exposures you used. Then merge the stacked image using a software capable of loading them as layers, like GIMP. Processing them all at once will only make the stacking fail because of the incoherence between images.
How do I process several sessions? #
If you have shot an object in several sessions (nights) and you had to move the camera between them, you will have a set of flat images for each night, possibly a set of darks too if the temperature changed significantly. You still want to stack the images of the different sessions together to get the best result.
The correct way to go is:
- Calibrate all sessions independently with the corresponding master files
- Register all preprocessed images together. For that you need to build a new sequence that contains all files, which can be done in several ways:
- At the conversion step, specify a starting index. For the second session for example, use a starting index that is greater than the number of images in the first sequence, and for the third higher than the sum of the two previous, and so on. Then you can simply put all files in the same directory and they will be detected as a sequence if they have the same prefix in their name.
- After preprocessing, you can rename images to not overwrite each other, either with a utiliy or a shell script.
If this looks too complicated, the whole procedure can be done automatically with sirilic after a brief configuration!
In which order should image processing functions be used? #
After stacking, the image can still be improved and Siril provides numerous tools to do so. The order in which they can be used is not trivial, and not necessarily the same for everybody, here is an ordered list of operations that may be applied on a color image:
- Cropping the image. Borders of different colour may appear during stacking, they will alter image statistics that are used by several image analysis or processing tools.
- Removing the background gradient. It can also be automatically removed from raw images, which is more efficient if the capturing session was long and the gradient was changing significantly.
- Calibrating the colours, manually or using the photometric colour calibration. Since 0.99.8, annotations become available after plate-solving.
- Deconvoluting the image.
- Transforming the histrogram, using the asinh transform or histrogram transform tools, or both. The CLAHE tool can also be used, but is best suited for galaxies.
- Removing the green tint dominance if needed
- Adjusting colour saturation
- Rotating the image if needed. If it was upside-down, plate-solving could have reoriented it already.
- Exporting to a Web format, using the save as function.
Is there a drawback for using scripts? #
Yes. Scripts automate processing by doing what generally works fine, but in real life, you may need to tweak a few parameters, verify that everything is going fine at each step, look for warning and error messages. A few common things to add to a script are: per-frame gradient removal, changing the star detection settings, removing the need for some calibration files and reject some bad images from the result.
The latter can be easily added to the script at the final stacking command with the -filter-fwhm=75% for example to keep 75% finest images. See the possible arguments in the commands reference .
Otherwise, you can simply run the stacking manually after the script execution. Set the working directory to the directory that contains the registered sequence (called process if created by an official script), go in the sequences tab, click on search sequences, select the registered sequence, in general prefixed with r_pp_, and go in the stacking tab. You will see many options there including the possibility to add multiple filters.
Could you add commands to delete files or sequences? #
Short answer: No.
Detailed answer: Siril’s role is not to clean up your operating system. It is a great responsibility to delete files in bulk in an unsupervised mode (through scripts) and we would rather you deal with this matter with dedicated tools, such as bash or Python (pySiril
for instance). Then, with default scripts, intermediate files are all stored in the process directory, that can be easily deleted. Finally, there is one important reason we want to keep all intermediate files on the disk: one can re-process images at every steps without redoing everything from scratch. So this is a strength, not a weakness.
What is sirilic? #
Sirilic is an external program that provides a graphical user interface in which all input files can be documented and that executes Siril to obtain the desired result(s). The input files can be of various types of sequences or file formats, can be from monochrome or colour sensors, can be from different sessions, using different filters. It pilots Siril to do all the preprocessing and stacking based on all input information.
How can I create a script? #
Scripts are text files that are read by Siril line by line. Each line with text must be a command that conforms to the commands reference . The best way to write one is in general to copy an existing script and modify it.
Since scripts provided by Siril are usually installed in protected directory (like program files on windows or /usr elsewhere), it is wise to copy the file in the user directory. Siril can be told where to look for scripts in the preferences. See the procedure in the scripts documentation .
Watch the log carefully to check that you script runs correctly. If a sequence is not found, possibly you are missing a cd (change directory) command or you changed the sequence names by changing how they are processed and need to account for it.
My camera is not cooled, what does that change? #
It is perfectly fine to not use thermally stabilised cameras for astronomy as long as the thermal noise (also known as dark current) is accounted for in the preprocessing. The official script uses a master dark to calibrate input images, considering that all light and dark frames were taken at the same temperature and exposure. With DSLR and other non-cooled astronomy camera, it is not the case, especially for long acquisition sessions.
The correct way to process these images is to use dark optimisation in Siril, which scales the level of the dark to the level of additive noise in the image, simulating a master dark made at a different temperature:
- You will need to calibrate the darks, with a master bias image or a synthetic bias . This is in general the same as for the flats calibration.
- Create a calibrated master dark: preprocess the dark frames by subtracting the master bias (or value) from them, create the master dark with the resulting sequence.
- Modify the scripts to add the
-optoption to thecalibratecommand (see the command reference ), or check the Optimization box next to the master dark field in the preprocessing tab is you process manually. - Make sure you use the calibrated master dark instead of the regular dark image if you are modifying a script
- Preprocess your light images with both the master bias (or value) and the master dark, otherwise the optimisation cannot be done
What can I do with color images shot with a (dual) narrowband filter? #
These filters are becoming increasingly popular amongst color imaging users and Siril has a specific process to take full benefit of these filters.
-
If you are processing with scripts, there are dedicated scripts that come embedded with latest versions of Siril. Select
OSC_Extract_HaorOSC_Extract_HaOIIIfor Halpha or Halpha/OIII filters respectively. -
If you are processing manually, you need to proceed with the following changes:
- At pre-processing step: uncheck the
Debayer before savingtickbox. - With the preprocessed sequence loaded, now head to
Image Processingmenu,Extraction,Split CFA Channels. In the dropdown, select the type of filter. Don’t forget to tickApply to sequencebefore clickingApply. At the end of this stage, you get 2 sequences starting withHa_andOIII_for a dualband filter (only one with Ha extraction only). - Then for the rest of the processing, you will need to apply registration and stacking to the 2 sequences. Another difference compared to the usual workflow, tick the
Simplified Drizzle x2box in theRegistrationtab. This will get you back to the intial resolution of your sensor that layer extraction had decreased by two. - Once you have stacked the two mono layers, you can linear match them to “equalize” their levels. Load the OIII stacked image, go to
Image Processingmenu,Linear Match. Select your Ha stacked image as the reference and clickApply. Don’t forget to save the result of this step by clicking theSavebutton. This part is also documented in the RGB composition tutorial .
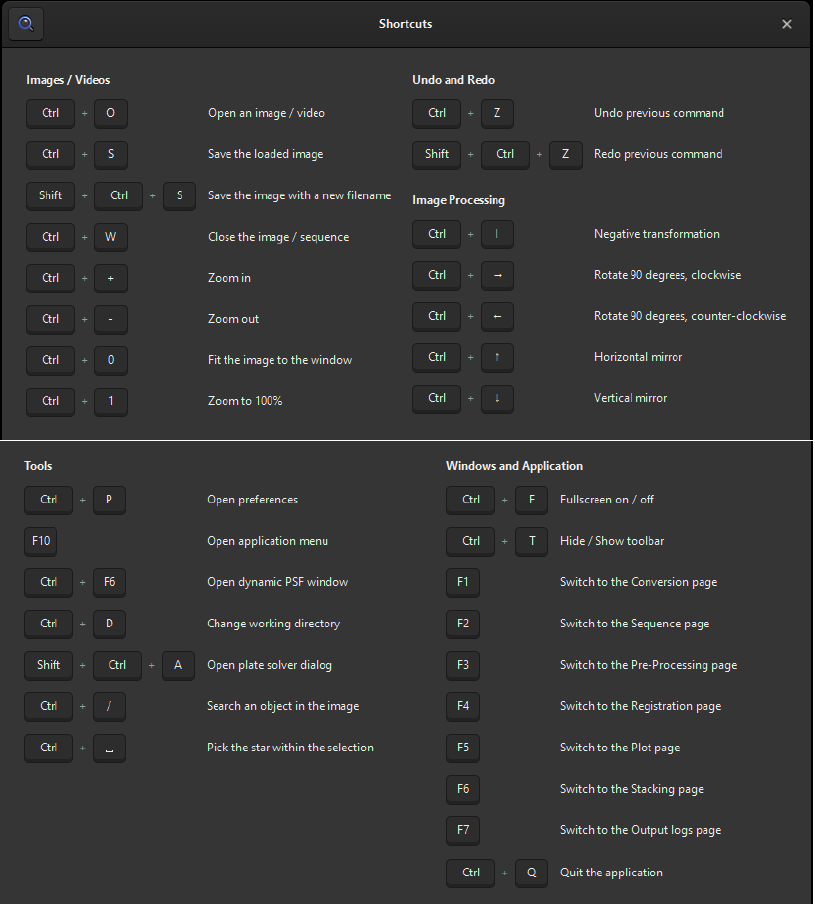
What are the existing shortcuts? #
You can access the list of shortcuts via the ‘burger’ menu of Siril. However, we have attached some screenshots here:
Can I use Siril with no graphical interface? #
Yes. The executable siril-cli is what you are looking for. It can either execute a script (-s option) or receive commands from standard input of from a named pipe (-p option).
Scripts don’t have to specify the working directory and can be kept generic enough by setting the working directory from the command line (-i option). See the man page for more information and the script page
.
How can I contact Siril’s team #
The Siril team can be contacted on the forum or on gitlab for bug reports. Siril is a free software, meaning that anybody can contribute to it, either in the development, translation, documentation or support. Of course donations are welcome.
How can I contribute? #
There are several ways you can contribute towards the success of Siril.
If you’re technically able, you can help build the database of sensor and filter data that allows users to perform highly precise color calibration using our new SPCC feature. You can access the database here: Siril SPCC Database . In our Siril 1.4 documentation page , we’ll walk you through the steps on how to contribute to this valuable resource.
Alternatively, you can take advantage of our Python scripting feature to create new image processing filters, visualization tools, third-party integrations or other useful plugins. You can submit your scripts to the official Siril repo by following the process documented here .
We’re also seeking volunteers to help translate the software and its documentation. If you’re interested in contributing, whether you’re fluent in one language or several, we’d love to have you on board. This will ensure that Siril is accessible to a wider audience around the world. To get started, simply create an account here: Weblate Siril Translation .
Another valuable contribution is to spread knowledge of Siril processing techniques and workflows on community forums and on your own Youtube channel, website or blog.
And finally, if you’d rather contribute towards costs, you can do that here .
Common problems #
Why can’t I save my processed image on Windows? #
You probably have an antivirus software that prevents it. We had several reports of AVAST preventing Siril from creating or modifying files. Make sure you put Siril in the white list of your antivirus software, as not doing so can considerably slow down processing, if not even making it fail.
Why the Redo/Undo button don’t work? #
Redo/Undo need to save data in a folder in order to restore it if needed. This folder is called swap directory. If it does not work it is possible you need to go to Siril’s preferences and restore the swap directory.
Why are my images upside-down? #
We have a page dedicated to this on the documentation. The short explanation is that your acquisition software stores images in a non standard way. You can give the link to this page to their creator if you can reach them, otherwise you can tell us which software it is and we will contact them. Note that if you don’t use the latest version of your acquisition software it may have already been fixed (most of them use it in 2021).
What is the pattern that appears in the background? #
With short exposures or with few light images stacked, a diagonal pattern may appear in the dark areas when histogram is stretched. This is due to the camera and it is not easily removed because it has a smaller amplitude than the signal we have in the images usually and because it is caused by pixels that behave asymmetrically from the median.
There are ways to avoid it however: increase the number of frames or their exposure, and most importantly, use dithering. In that case dithering refers to the misalignment of frames on the sky, requiring the registration to actually do something. If images are all exactly the same, the pattern will appear, if not, it can be diluted. If you use autoguiding, there is probably an option to move every few frames to not get the stars on the same pixel all the time.
Why are colours unreal in the stacked image? #
Siril does not keep white balance and does not use sensor photometric information in the conversion or processing steps. The stacking result does not need to be kept as taken because it cannot be guaranteed to be correct anyway. The correct way is to correct the colours after stacking, during the processing of the results, either in Siril with the photometric or the manual white balance tools, or in external software.
However, sometimes the images look very purple, it can be an indication that the colour filter array of the colour sensor was wrongly detected. Look at the console (last tab in the graphical user interface) to see if there is any warning related to this. You may have to specify the correct pattern for a Bayer matrix in the preferences if the problem persists. In case of doubt, contact us.
It is perfectly normal to get a stacked image with a green dominance since cameras are more sensitive to these wavelengths.
Why are exported images so dark? #
The exported images use the real pixel values of the images, not necessarily the image that you see on screen. The displayed image are transformed by a screen transfer function, often set as Auto-stretch for deep-sky images in the lower part of the graphical user interface. The real pixel values are only seen with the Linear function and with the low and high cut-off sliders set to the minimal and maximal values. Images look dark like this, even completely black sometimes.
To export the image with a good signal, set this Linear mode and 0 low and the maximal high cut-off values and use the histogram transformation tools (Asinh, Histogram or CLAHE from the Image processing menu) to change the pixel values. Then you can export the image, it will be like what you see.
Why doesn’t registration find stars in my images? #
It can happen with images that have an unusual signal level, either too low signal/noise ratio or that had the bias signal removed twice leaving the background with many nil values. It can also happen with images that have very elongated stars due to a bad Earth rotation tracking.
To fix this, open the Dynamic PSF dialog window, either from the settings of the global registration or from the Tools menu then in the Image information submenu. You will find here some settings to tweak and a button to start star detection. If you find a setting that detects at least 20 stars in your images, you can restart the registration, it will use these settings. If you close Siril, you will have to do this again.
Why does astrometry solving fail? #
Siril can perform a plate-solving from an online database, either for astrometry or photometric calibration purposes. It can fail for a few reasons:
- The image you are trying to solve is not linear, meaning that you already stretched its histogram. In that case, the relative brightness between stars is not preserved and they cannot be identified
- The pixel size or focal lengths are not close enough to the real values. Don’t forget to account for correction or zoom lenses places in the optical path. Sometimes a small change to above or below the actual values can be enough to make it work
- Rarely, it’s just too difficult to solve an image automatically. If you can share the failing image with us, it may help us improving the algorithm
How can I remove a complex background gradient? #
It happens frequently that the background gradient is too complex to remove with a four-degree polynom, even if the master flat are perfectly done. This is caused by a too much changing light pollution or moon or horizon brightness relative to the angle of the acquired pictures through time. Recent versions of Siril provide a way to handle this: removing a linear (one-degree polynom) gradient from all individual exposures instead of doing it after stacking. The result is in general much better, but it takes more time to process.
-
If you are processing manually: After preprocessing your lights, go to
Image Processing->Background Extraction. Set the polynom order to 1 or 2 and tickApply to sequencebox at the bottom. ClickApplyand proceed with registration. -
If you are using script or via console: Use a [
seqsubskycommand](https://siril.readthedocs.io/en/stable/Commands.html#seqsubsky after preprocessing command. Don’t forget to call sequence prefixed withbkg_pp_for the registration step.
Note: if you are separating layers from color images (Ha or Ha/OIII), this step must be done after layers extraction on each layer.
Why do I get error messages with my AVI files? #
While Siril is able to convert, load and do basic processing of AVI and any film file, the more complex algorithms are not available for this type of sequences. We have a page on the documentation explaining why these file formats should not be used for astronomy and why SER files should be used instead.
Recent versions of Siril can also use a single-file FITS sequence. Compared to SER, the main advantage is that it can contain 32-bit per channel pixel values, where SER is limited to 16. FITS can also use file compression transparently.
Why is Siril so slow or freezing my computer? #
Processing images is a resource-intensive operation. Siril tries to use all memory and processor cores and threads it can get. In general, it adapts well to various operating conditions, but sometimes it badly detects the available memory, or a single image can be too large to fit entirely in memory for the various processing steps. In that case, virtual memory of the operating system is used if it exists, and this is extremely slow because it uses the hard disks.
The other reason would be that you are using a rotational hard disk drive, which you shouldn’t for image processing because it’s too slow and will wear off too fast.
Recommandations:
- Exit all other software you can exit when running Siril, including an antivirus that will only slow down the computer and web browsers that are huge consumers of memory
- If you still want to use your computer for other purposes while Siril is processing images, you can reduce the amount of processor threads that Siril will use at the top of the graphical user interface or with the setcpu command or reduce the amount of memory that Siril will detect as free in the preferences or with the setmem command . In any case, if the available memory decreases while Siril is running, Siril may run out of memory and freeze or crash your system.
- Have at least 2GB of memory available for monochrome image processing, 4GB for colour images. It depends on image size of course.
- Do not enable 32-bit per channel images if you don’t have a lot of memory (it can be forced to 16 in the preferences, this is not the default in 0.99 and above).
- Do not use sub-pixel registration (also known as simplified drizzle) in the interface.
If you feel that free memory is badly detected, contact us, we don’t develop with all operating systems.
What should I do if my processed image doesn’t look good? #
If you use scripts, you can only see the stack result and not notice that something went wrong before. It is a good idea to place Siril in the process directory after script execution, to check a few things:
- open the master calibration files, since they are stacked images their name ends with
_stacked.fit, like dark_stacked.fit and pp_flat_stacked.fit (pp_at the start means it has been calibrated). Check that there is no parasite lights, that the pixel levels are correct. - in the sequences tab, click on
Check sequencesto list the sequences available in the directory. You can review them, opening the image list of the sequence (button on the right of this one), verifying that there was no obvious problem during acquisition like telescope movement or clouds. - if input images look good, open the registered sequence, by default named
r_pp_lights_, to see the plot of registration data for each image, to see how it evolved during the session. Maybe the focus went bad at some point.
If the noise is too high, maybe you simply need more exposures, or use dithering.