Manual pre-processing
Introduction #
In this tutorial, we will study the pre-processing process of an astro image taken with a digital camera (DSLR), but the processing of images from astronomical cameras is almost identical. Of course, Siril comes with scripts that perform this process automatically. However, in a number of cases, you will need to perform manual processing:
- You want to understand what the scripts do: the best way is to do manual pre-processing!
- You want to refine the pre-processing: scripts use default values that can be optimized
- Your images contain gradients that are difficult to remove during processing. It is very interesting to remove them on raw images: the gradient is simpler and easier to eliminate.
- You’re missing flats: of course, this is formally discouraged, but photography sessions don’t always go as planned!
- And many other reasons… that belong to you :-)
Files used #
For this tutorial, we will assume that you have images of the object, biases, flats, and darks.
File organization #
It is better to organize your files in different subfolders. We will follow the subfolders used in the scripts: lights for images, biases, darks, and flats for calibration images.
Pre-processing principle #
The image calculation is done by the following formula:
$\frac{\text{image}-{\text{dark}}-\text{bias}}{\text{flat}}$
By principle, biases are contained in all the images we have taken: the lights of course, but also in the darks and flats. We will therefore need to remove the biases from the darks and flats to use these calibration images. But let’s analyze this formula. We see that:
$\frac{\text{image}-{\text{dark}}-\text{bias}}{\text{flat}} = \frac{\text{image}-({\text{dark}}+\text{bias})}{\text{flat}}$
We notice that it’s enough to subtract UNPROCESSED darks (which also contain biases) to remove both the dark AND the biases at once: saving work and time!
To pre-process the images, the proposed workflow is as follows:
- Set the working directory.
- Convert the files.
- Know the bias value of your DSLR or camera (or create the master bias (or bias).)
- Create the master flat, by subtracting the master bias.
- Create the master dark, without subtracting the master bias.
- Calibrate the images, with master flat and dark.
- Process gradients.
- Align the images.
- Stack the images.
Set the working directory #
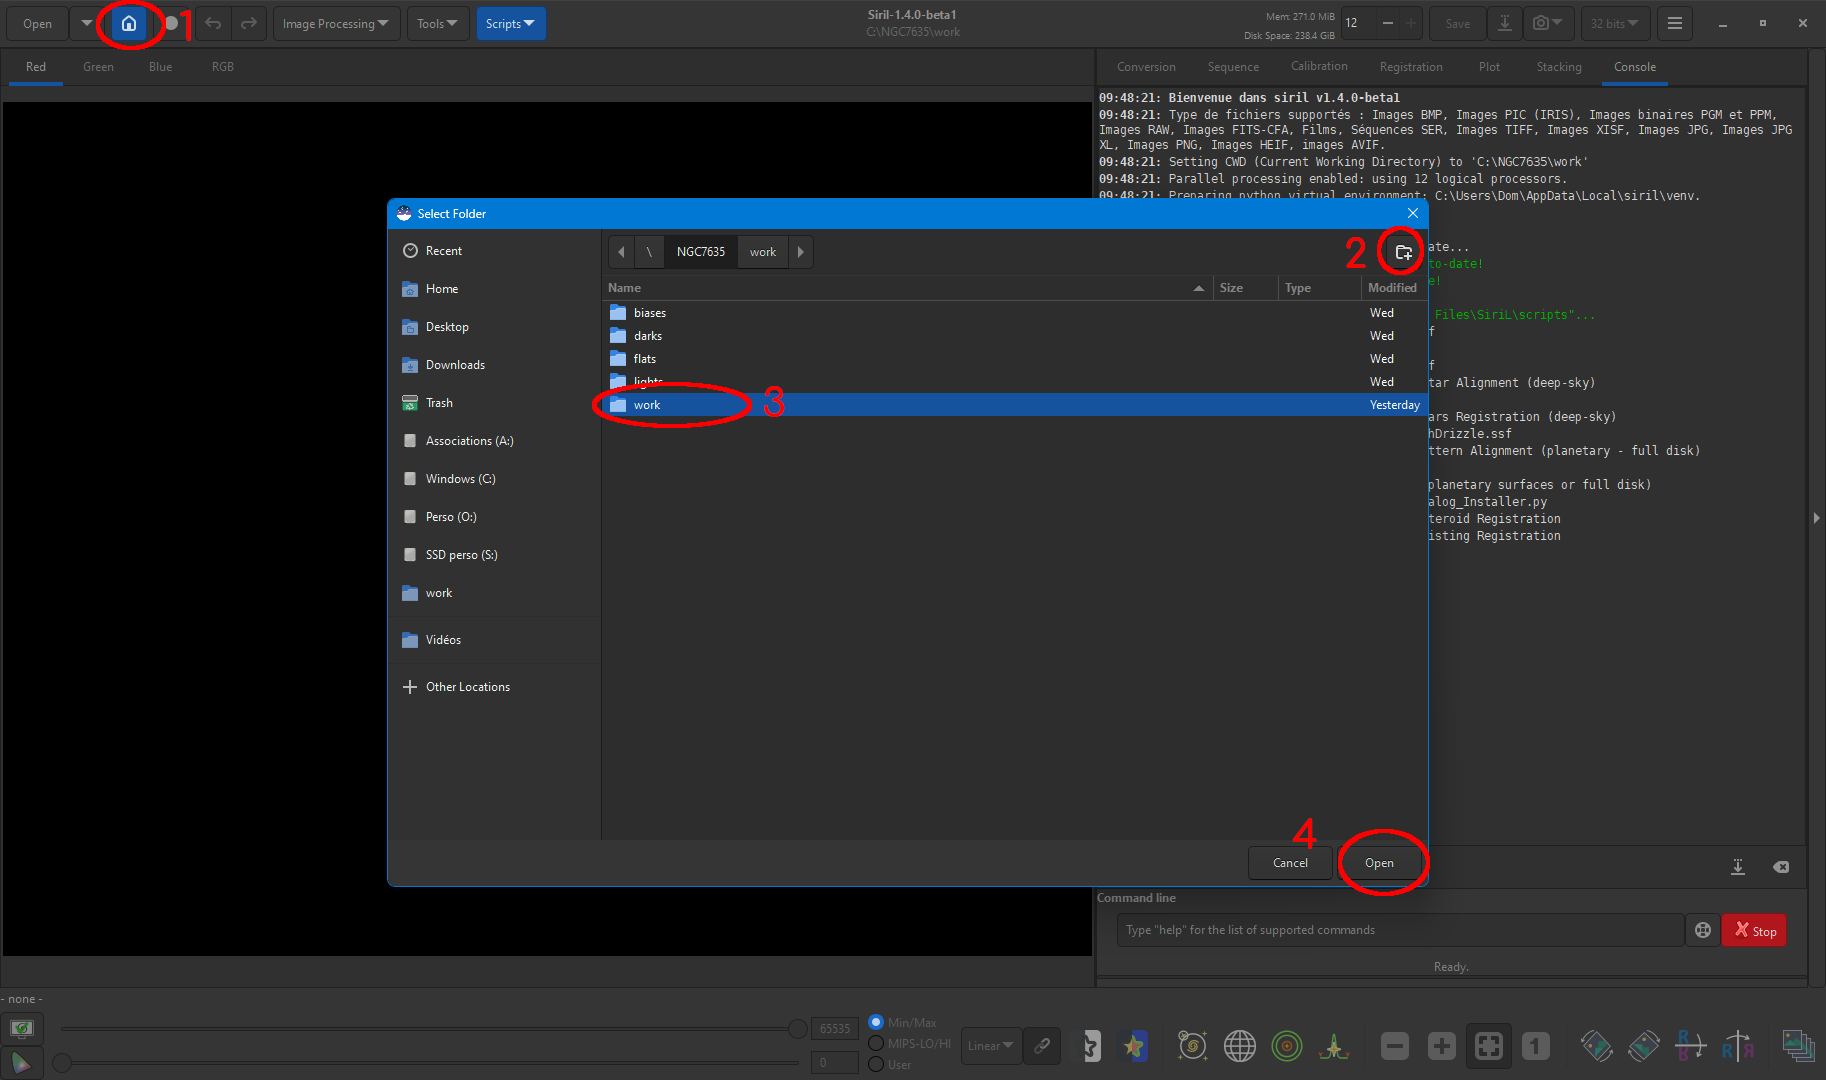
Set the working directory.
- Click on the
Homeicon - Search for the folder where the images are located, then create a
workfolder (scripts create aprocessfolder) - Double-click on the
workfolder to enter it - Validate
All images will now be saved in this folder
Convert files #
Convert your files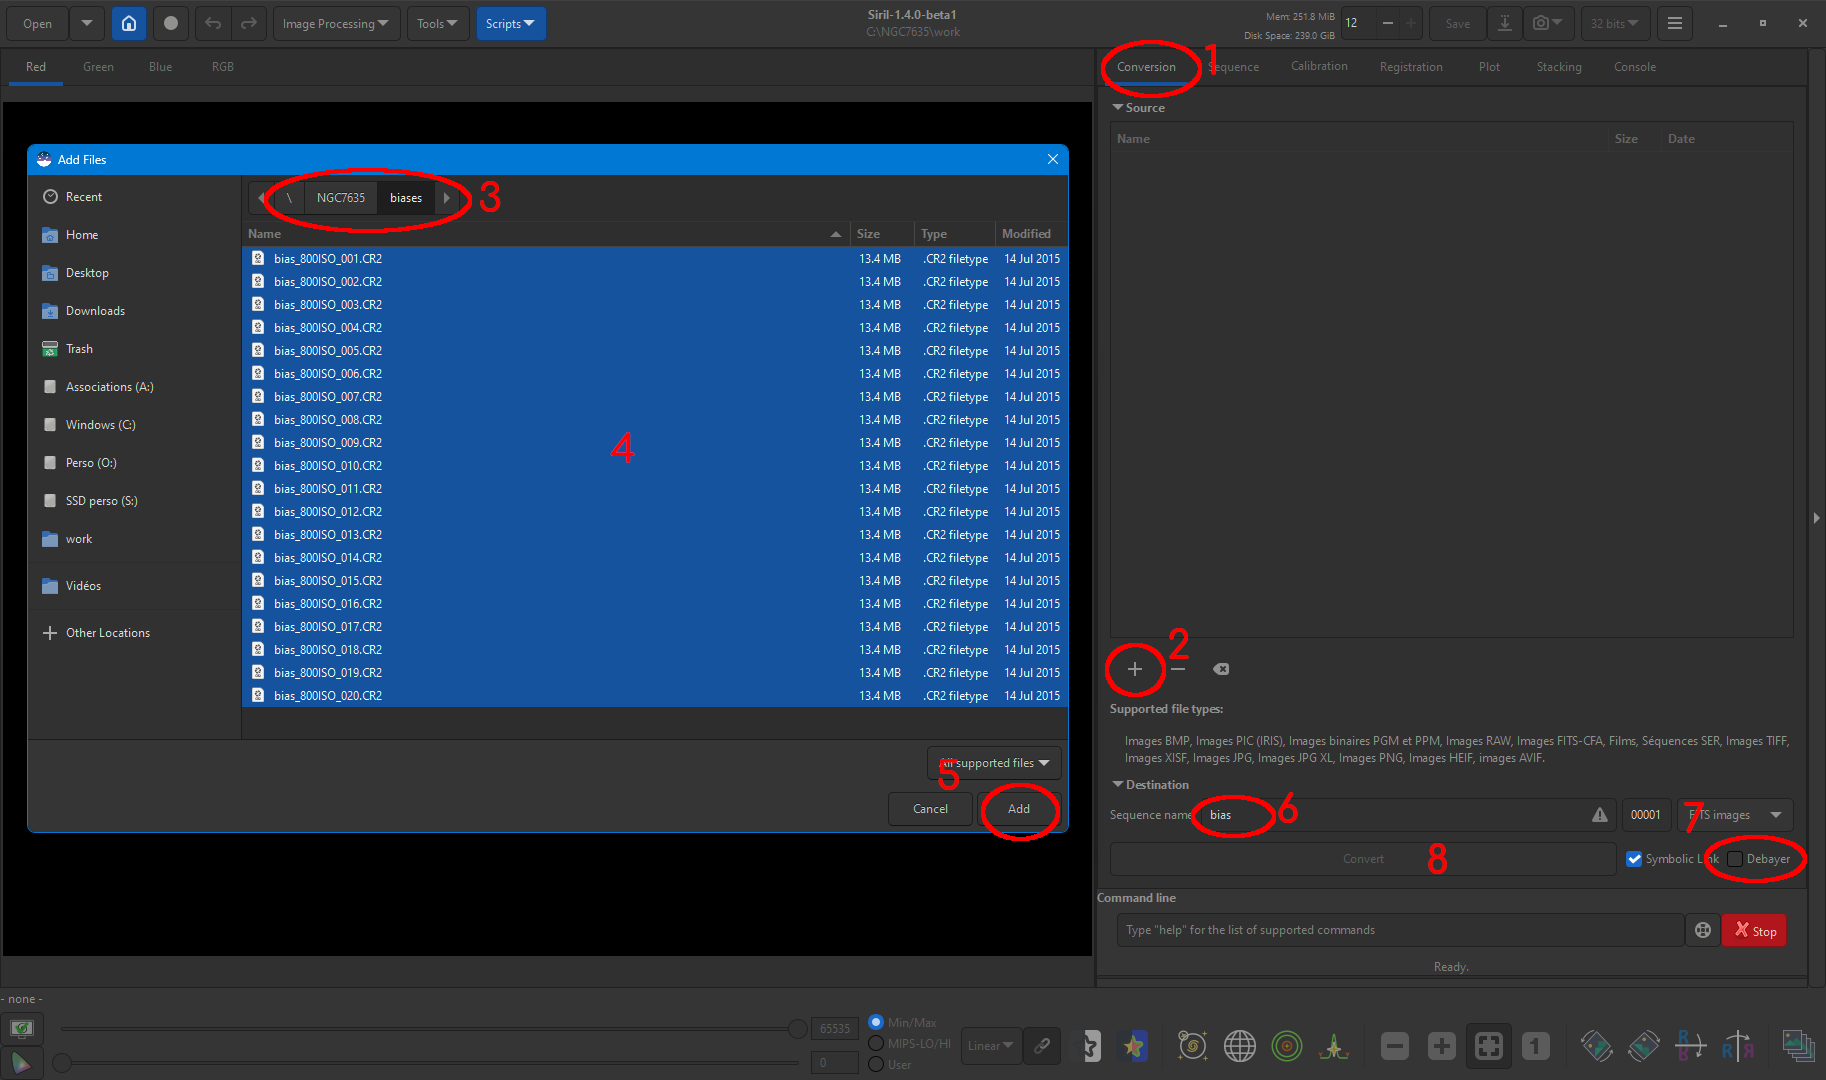
- Click on the
Conversiontab - Click on
+ - Search for the folder where the images to convert are located (by default, we are in the working directory)
- Select the images to convert
Add- Give a generic name to the images to convert (lights, flats, …). Siril adds a number after this name to differentiate the images, and this allows sequence creation.
- Check that the
Debayeroption is unchecked (we will do debayering later) - Click on
Convert
Siril converts the images to .fit format in the default folder. Then repeat the same process with lights, flats, biases, and darks, giving each a descriptive generic name.
Sequences #
A word about sequences, very important in Siril. A sequence is a series of coherent images: the images, darks, biases, etc. These sequences are listed in small files with the .seq extension. Thus, when you convert bias images giving them as sequence name: Bias, the converted images have the names Bias_00001, Bias_00002, Bias_00003, etc. The corresponding sequence name is Bias and is contained in the Bias.seq file that we recommend never editing manually.
It is quite possible to have several sequences in the same folder. However, always remember that you must ALWAYS choose the working sequence before processing. Most often, by default, Siril loads the last calculated sequence, but keep this in mind!
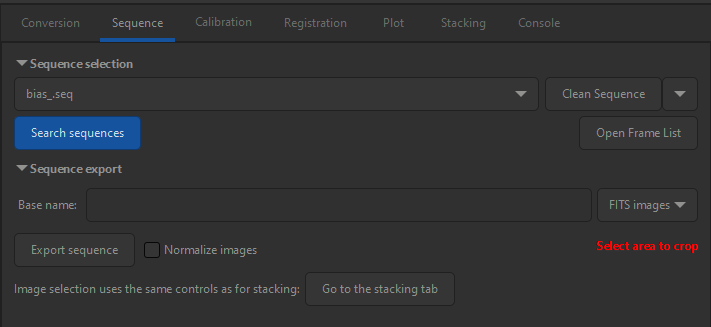
In the Search sequencesSequences tab, the Search sequences button analyzes your folder and searches for sequences:
Biases #
Frankly, use synthetic bias, you’ll avoid adding noise to your images. See this tutorial .
If you really can’t find your synthetic bias, then take bias images.
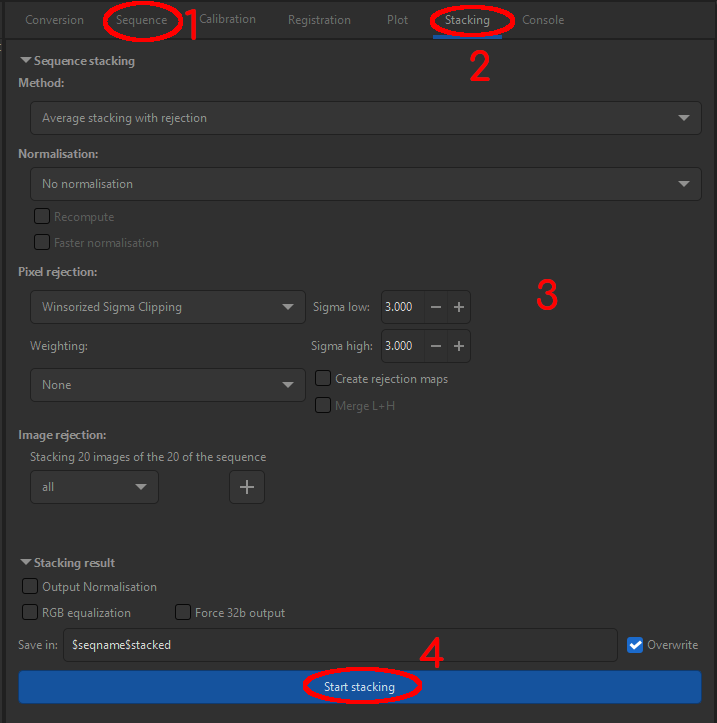
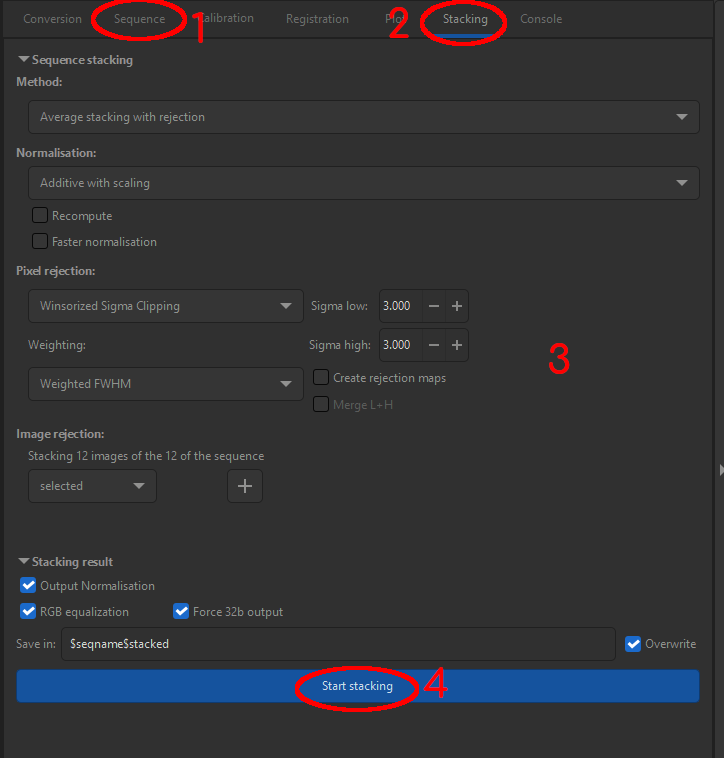
Process biases
- Click on the
Sequencestab, then choose the bias sequence. - Click on the
Stackingtab. - Set the parameters as above.
- Click on
Start stacking.
The calculation starts, Siril displays the console where you can follow the operations performed.
Once the calculation is finished, verify that the rejection rate is between 0.1 and 0.5%. These values are completely arbitrary and allow beginners to get an idea. It’s not necessary to insist on getting a value below 0.5%: a value of 1% may be just as good. Just keep in mind that you need to check this rejection rate, and if it has an aberrant value, redo the stacking by changing the Check rejection ratesLow/High Sigma values.
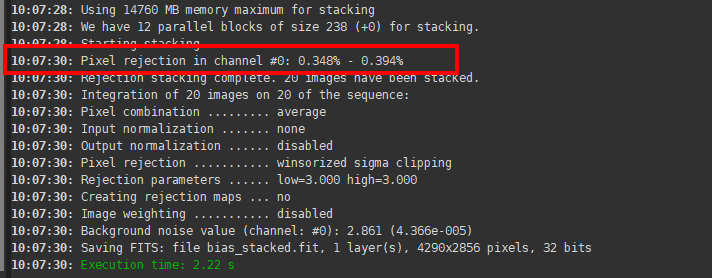
At the end of the calculation, Siril displays the stacked image. It is saved here as Bias_stacked.fit
Flats #
Calibrating flats #
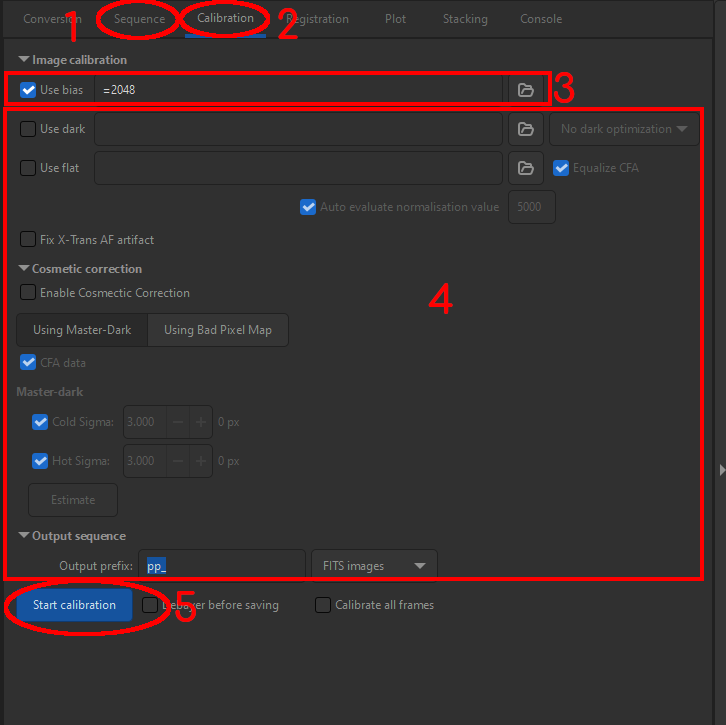
Process flats
- Click on the
Sequencestab, choose the flat sequence. - Click on the
Calibrationtab. - If you know your sensor’s bias value, enter this value preceded by the = sign (for example, for this DSLR
=2048). Otherwise, indicate the path to the master bias. - Set the other parameters as above. If, due to too long exposure time of your flats (several tens of seconds), you have taken dark flats, you will need to convert them, calibrate them, stack them to obtain a dark_of_flat_master (see the dark chapter below). You can then check “use dark” and indicate where the dark_of_flat_master is located. You can also enable “Cosmetic correction”
- Click on
Start calibration.
Siril subtracts biases from flats and creates as many processed flat files by adding the prefix pp_ to file names. You can of course change the prefix (pp_ = pre-process in English).
Creating the master flat #
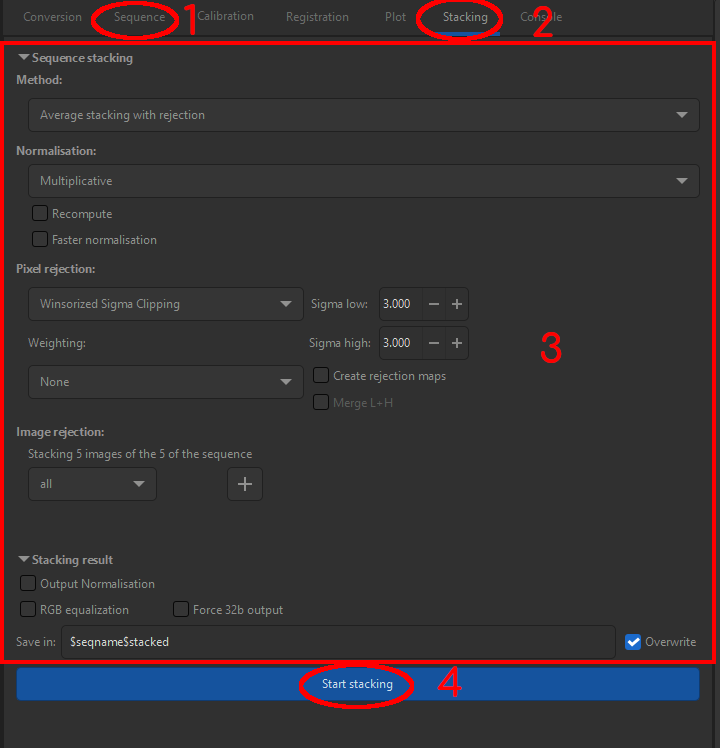
Stack flats
- Click on the
Sequencestab, then choose the preprocessed flat sequence (normally, it’s already loaded at this stage). - Click on the
Stackingtab. - Set the parameters as above.
- Click on
Start stacking.
Siril stacks the flats and creates the file with the defined name.
As with biases, verify that the rejection rate is between 0.1 and 0.5%. If the values are aberrant, redo the stacking by changing the Low/High Sigma values. When you increase a sigma factor, you lower the rejection rate!
Darks #
Stack darks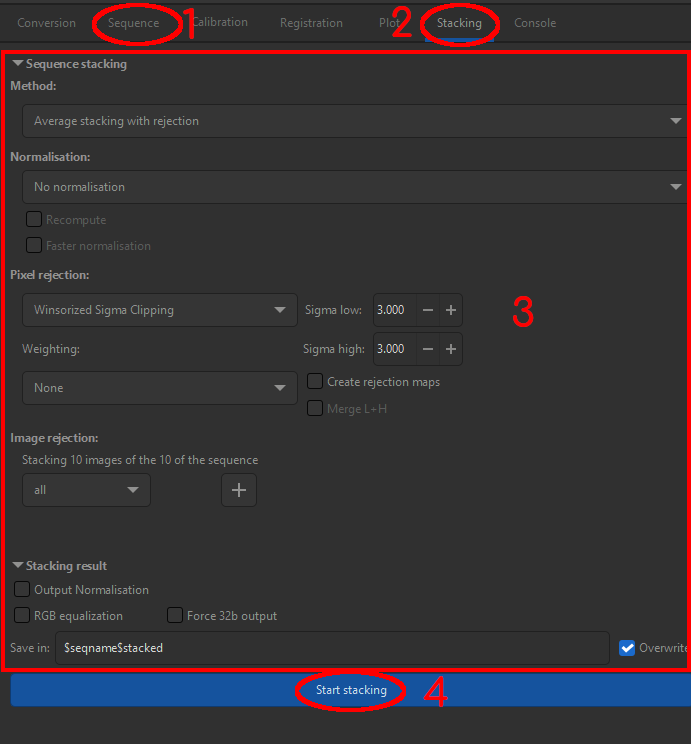
- Click on the
Sequencestab, then choose the dark sequence. - Click on the
Stackingtab. - Set the parameters as above.
- Click on
Start stacking.
Siril stacks the darks and creates the file with the previously defined name (here Dark_stacked.fit, but you can give it any name you want).
As with biases, verify that the rejection rate is between 0.1 and 0.5%. If the values are aberrant, redo the stacking by changing the Low/High Sigma values. When you increase a sigma factor, you lower the rejection rate!
Images #
Calibrate images #
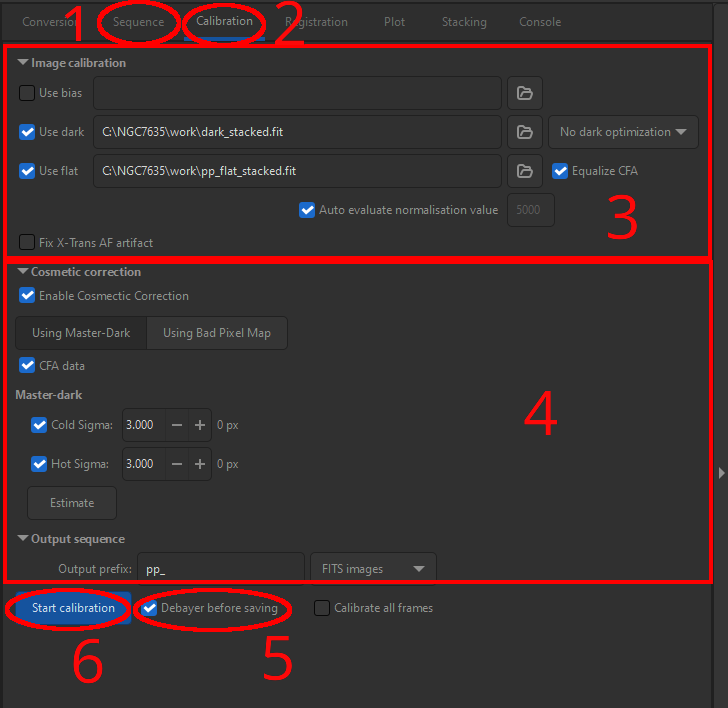
Pre-process images
- Click on the
Sequencestab, then choose the raw image sequence. - Click on the
Calibrationtab. - Set the parameters as above.
- Click on
Estimateto know the number of pixels corrected by cosmetic correction. If one of the numbers turns red, change the sigma value. If the value remains red despite sigma value changes, then you can uncheck the corresponding cosmetic correction (hot or cold pixels). - Click on
Debayer before savingto convert images to color. - Click on
Start calibration.
Siril processes the images with darks (and the biases they contain) and flats and creates as many processed image files, with the prefix pp_ (which you can change).
Gradient removal #
If your images show a gradient, usually due to light pollution or the Moon, it’s very likely that this gradient evolves during your session and therefore the appearance changes on your images, especially if you’ve been imaging for several hours. It’s then much better to remove this gradient directly on raw images. Indeed, stacking would make this gradient much more complex to eliminate later.
Remove gradient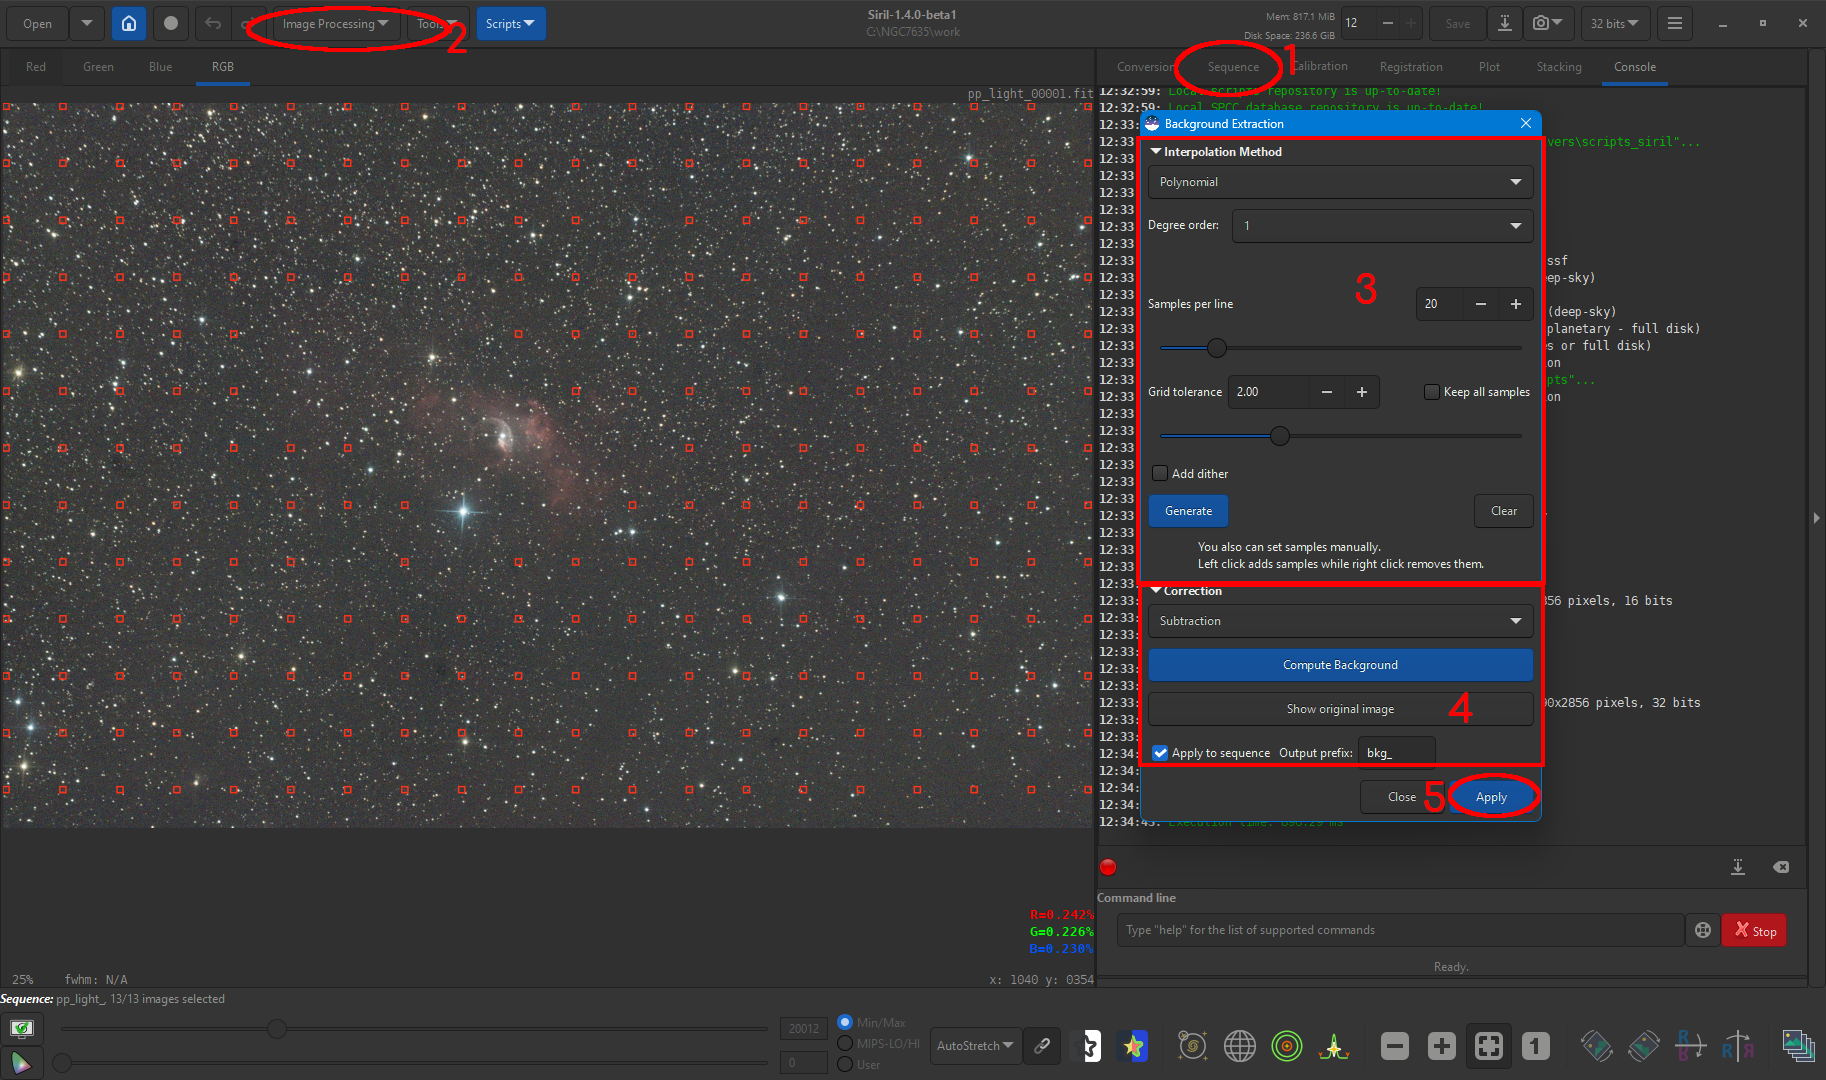
- You’re now used to it, check that you’re working on the calibrated image sequence
- Menu
Image Processing -> Background Extraction.... - A window opens. We will place measurement points, Siril calculates the sky background level under these points, and deduces a polynomial interpolation of the gradient: a synthetic sky.
The first thing to set is the interpolation method, which we’ll choose “Polynomial” of order 1 because as we said, the gradient shape is simpler on individual images.
Then we give the number of points to position on a horizontal line. Here, I kept the proposed value at 20. We can also limit tolerance so that Siril doesn’t position too many points near the nebula. Then click on
Generate. Siril then positions the calculation points (squares): you can remove some (right-click on a square) or add some (left-click in the image where you want to add it). - For light pollution gradients, the correction type to choose is
Subtractive. - Don’t forget to check
Apply to sequence, and here too, you can choose an output prefix for the new image sequence that is created. Click onApply. Siril then recalculates a new image sequence freed from the gradient.
It may be necessary to redo gradient extraction during processing, but this will then be much simpler to achieve.
Platesolving reference image #
This step is optional, but it will help improve image stacking.
Astrometry
- Check that we’re working with the right sequence
- Menu
Tools -> Astrometry -> Astrometric resolution - A new window opens. Enter the name of the object, and click on
Search. The coordinates and object name appear below - Enter the focal length of your telescope or lens, and the pixel size of your imager.
- Check
Auto-cropif the image is a wide field. - Click on
OK. The astrometry process begins. - To verify it, click on this icon. The object references will appear in green in the image
Image alignment #
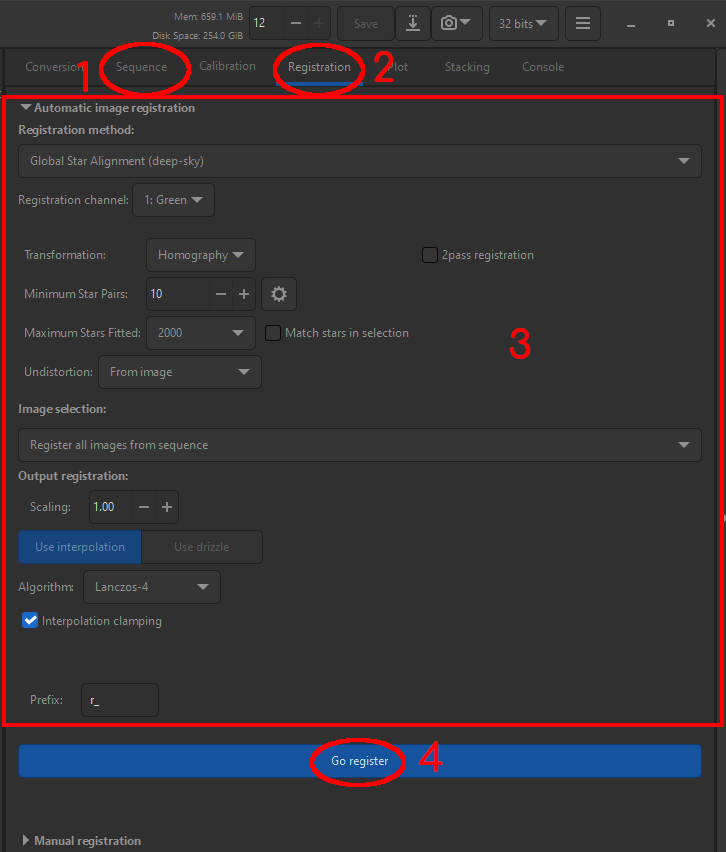
Pre-process images
- Click on the
Sequencestab, then choose the pre-processed raw image sequence. - Click on the
Registrationtab. - Set the parameters as above. Indicate that distortion correction should be done from the images on which we performed astrometry previously.
- Click on
Go register.
Siril aligns the images, corrects their distortion, and creates as many aligned image files, with the prefix r_ (which you can change in box 4).
Image sorting #
It’s time to check the quality of your images and eliminate the worst ones.
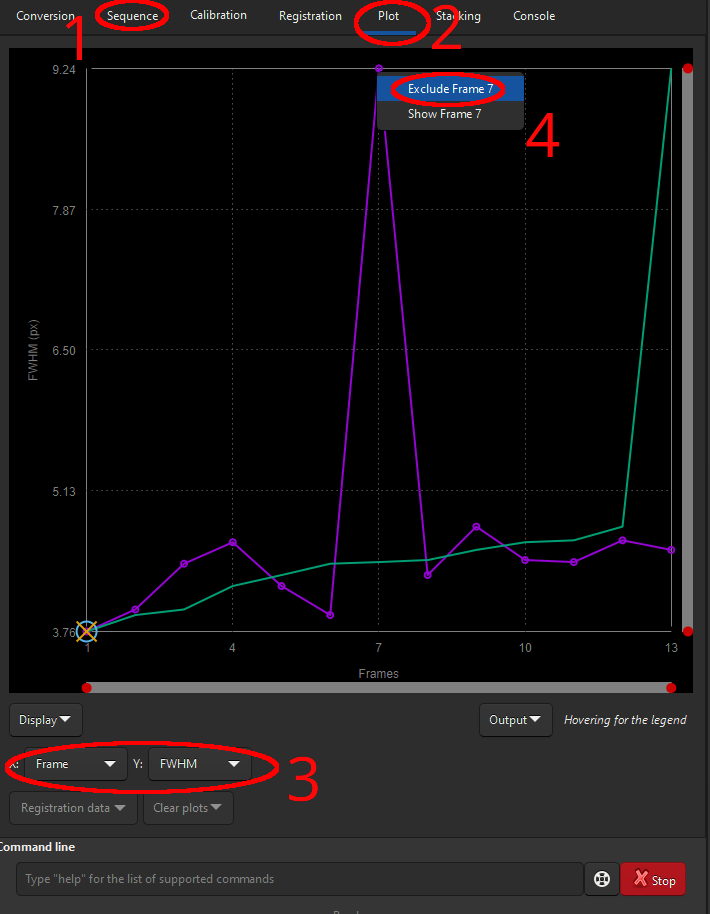
Image verification
- As usual, check the sequence you’re working on (if you just aligned, no need to check, Siril will have chosen the aligned sequence)
- In the Graph tab, Siril shows a quality graph of the loaded sequence images.
- You can set the X and Y axis values here using several parameters: FWHM, Roundness, wFWHM, background value, etc. This allows you to analyze your images under several parameters.
- To eliminate the worst from the sequence, right-click on an image with high FWHM and confirm “Exclude image XX”.
Image stacking #
Stack images
- Click on the
Sequencestab. And choose the aligned image sequence. - Click on the
Stackingtab. - Set the parameters as above. You can choose a weighting factor for images based on the number of stars detected during alignment, wFWHM, noise, or integration time.
- Click on
Start stacking.
Siril stacks the processed images and creates the file with the defined name.
As before, verify that the rejection rate is between 0.1 and 0.5%. If the values are aberrant, redo the stacking by changing the Low/High Sigma values. When you increase a sigma factor, you lower the rejection rate!
What’s next? #
This is the end of pre-processing with a clean, but still linear image. Don’t be surprised if it’s still all black, that’s normal! Processing remains to be done, but that’s beyond this tutorial. :-)