Processing partial solar eclipse in Siril
I was lucky enough to be on the path of the partial solar eclipse in the South of France on August 12th. I just wanted to share with you the workflow I used to make the most of this astronomical event, using Siril of course!
1. Gear and planning #
This may seem obvious, but the most important part of all this was to plan the shots carefully. The eclipse was at sunset and we were going to a picnic with family, which meant no fancy scope, no motorized mount, no astro camera, no computer. I was just going with a DSLR, a regular photography tripod, and an intervalometer to be able to enjoy the magic of the moment instead of keeping an eye on the watch. Of course, safety reminder: I also brought a pair of eclipse glasses to protect my eyes, and a dedicated filter for the lens. Mine was a DIY 3D-printed screw-in filter made from AstroSolar film, but you can get one off the shelf.
To plan the sequence, I used Stellarium and simulated the max eclipse time with my gear (APS-C with a 250mm lens) from my observation point. I then rolled back time until the sun was in the top left corner of the sensor. I figured the sun should be tangent to the top edge and about 1.5x its diameter from the left side, 9 minutes before the max.
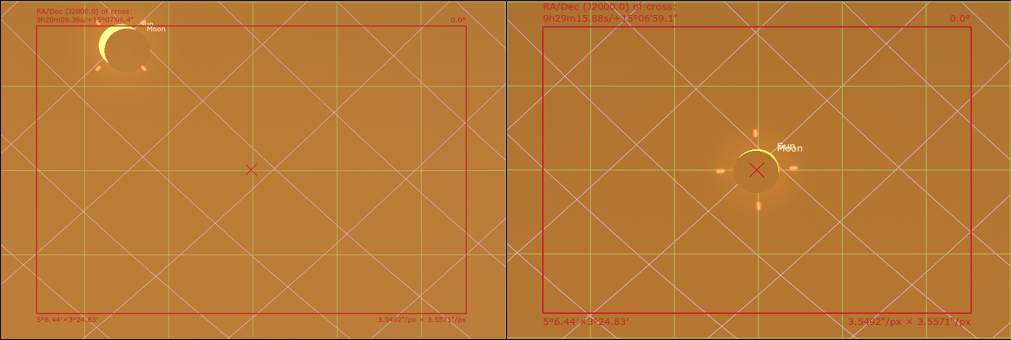
Sun position at sequence start time (left) and eclipse max (right)
I also used this exposure calculator to narrow down the exposure times. This turned out to be particularly tricky because the sun was so low — at maximum it was only 1.7 degrees above the horizon, with the end of the eclipse coming after sunset. As expected, I had to adapt the exposure throughout the sequence, since the light was passing through an increasingly thick layer of atmosphere. Lesson learned: I probably closed the aperture one stop too many (f/11), and ended up using 1s exposures for the last 3 images, when the sun vanished behind the mountains, with a histogram awfully squished to the left. But we’ll correct that later in the process.
2. Shooting the sequence #
Not so much to say here, it all went as per plan, a bit surprisingly. As mentioned just above, practicing beforehand — adjusting the exposure, checking the histogram on live view, and setting the intervalometer — is of utmost importance. I could definitely have used a bit more on-site experience the day before to refine the exposures but, well, we live and learn. I shot an image every 30s. I initially wanted to have one every 2 minutes to have a full solar disc separation between the shots. But this would have left too much space between the tiny crescents close to max, so it was good to have more material to experiment with later on. Once the sun had set, I removed the filter from the lens and shot a final image with those beautiful red/orange shades to use as background.
3. Processing the sun images #
Once home, I downloaded the SD card to my disk and opened Siril.
I created a sequence using the sun images only — the background would come later in the process. To be honest, I should have shot some darks and used a master dark for removing hot pixels, but I was too excited to see the outcome and skipped this step. Instead, I ran cosmetic correction over the sequence while it was still in CFA, then debayered it. No alignment was needed: I really just wanted to have the sun running through the diagonal of the image, as planned.
For the first attempt, I just ran a maximum stacking and the result was already quite promising.
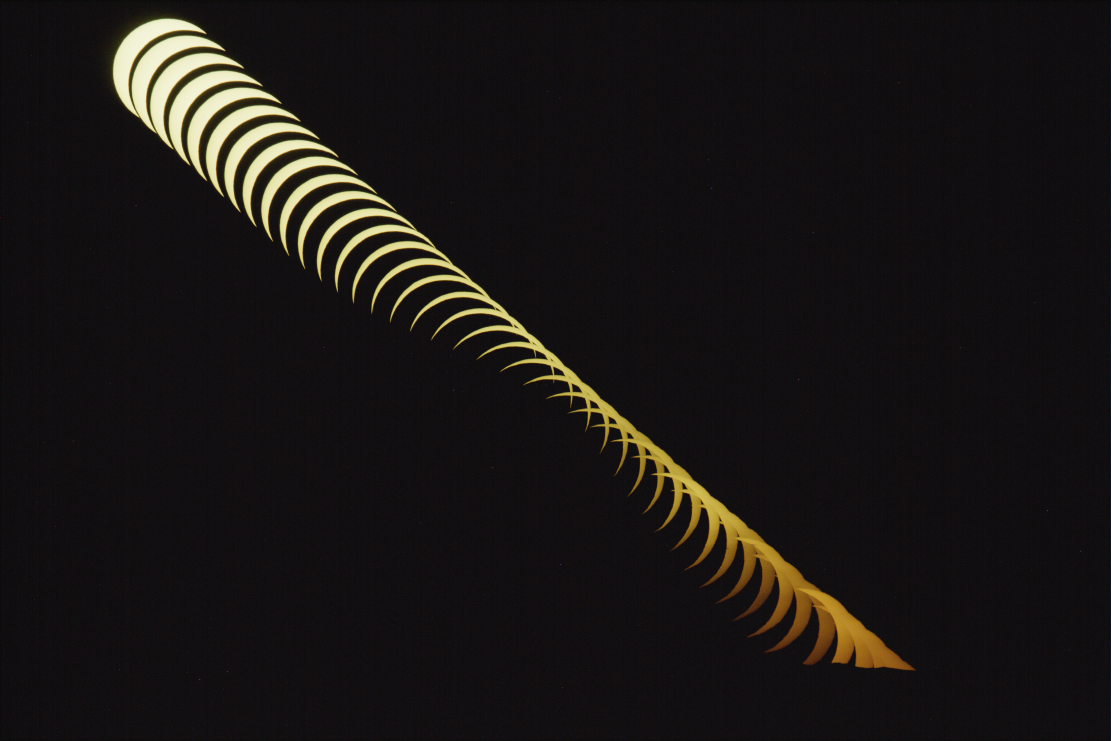
First attempt at maximum stacking - no exposure compensation (Autostretch)
A few things to note about this image. The crescents on the top left are a bit burnt — they shouldn’t look that white. And on the right tail, you can clearly see where I changed exposure settings.
So I ran a seqstat command to get the statistics and a seqheader to get the exposure values from the headers:
seqstat . solar.csv full
seqheader . EXPTIME -out=expo.csv
I tried to find a good statistic to use for rescaling my exposures — max seemed like the natural choice, but it’s not robust. Any hot pixels not caught by cosmetic correction mess up the measurement. Scale is much more robust and nicely correlated with the changes in exposure, but it’s not really a metric that can be used to rescale the images while making sure the histogram doesn’t clip.
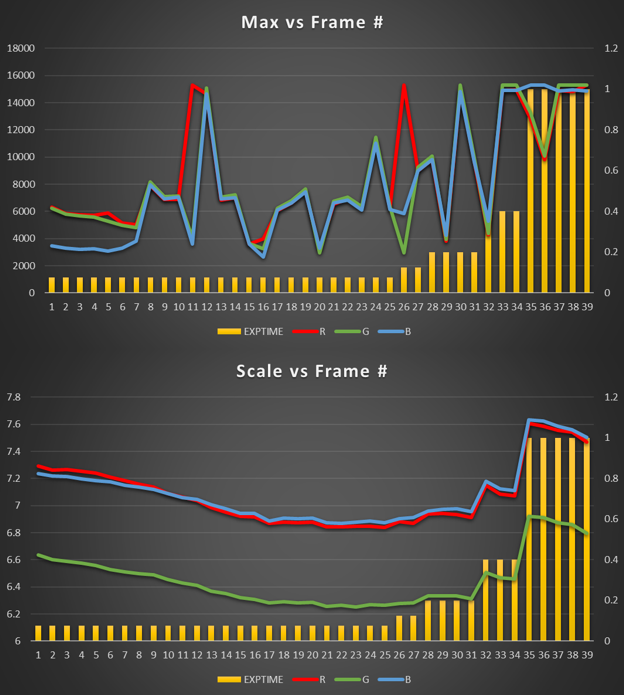
First statistics run - Max (top) and scale (bottom)
What I really wanted was to locate the last bump in the histogram that corresponded to the sun crescent and determine where it would bend. So Python scripting came to the rescue!
I wrote a little something that, for each image in the sequence, would:
- load the image and retrieve the pixel data
- remove the black point value (2048, in my case) from each channel
- compute the histogram of the red channel, smooth it, and determine where the highest bend occurs
- use this value to rescale (by multiplication) all the channels so that the red bend sits at the 75% level
- set all the background values to 0
- save this data as a new image with the prefix
renorm_, so Siril could detect the new images as a sequence
I rescaled everything based on the red channel rather than each channel individually, to keep the shift toward reddish colors as the sequence progresses.
The script itself is a bit messy and would need some polishing to be shared if required — I basically edited it until it made sense with my specific data — but you have all the steps here.
Once that was done, I reran maximum stacking on the sequence, unselecting every other image to have a bit more air between the crescents, and this came out.
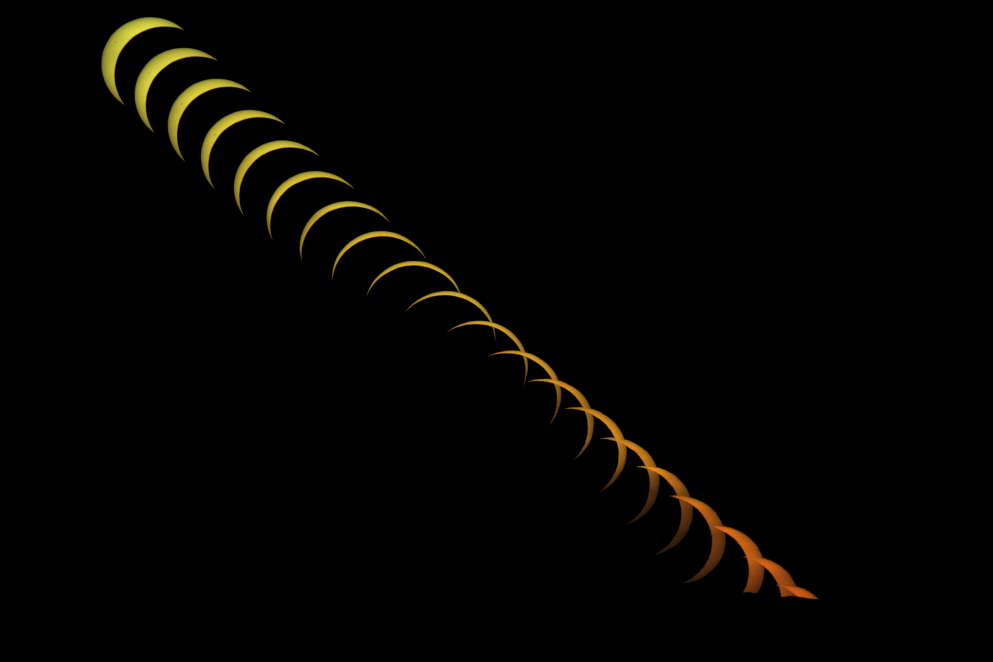
Final attempt at maximum stacking after renormalizing histograms to 75% (Linear)
4. Adding the background #
I could have kept it like that — I find the image very geometric — but I wanted to try compositing it with the background frame shot right after sunset.
So I opened and debayered the background raw image. I removed the black point value (2048) and then used Color Correction Matrices with coefficients for 5200K daylight, read from the image’s EXIF data. I finished with a touch-up in Curves, lowering the white point and slightly enhancing the shadows.
I then made a sequence with those two images, the background and the sun stack, set the background image as reference, and did a manual registration to align them. My tripod was a bit flimsy and the framing moved slightly when I unscrewed the solar filter to shoot the background, so I wanted to carefully align the bottom of the last crescents with the mountain tops of the background.
Once the registered images were created, I loaded them both in Pixel Math and applied this formula:
0.6*sun+0.4*bkg
I tested different proportions, but this ratio worked best to make the eclipse the most important subject of the final image while keeping the background nice. And voilà! I hope this post has revealed some Siril features you didn’t know about, and given you a few hints for processing your own eclipse images. This has definitely motivated me to train a bit more with my DSLR settings to be ready for the next eclipse!
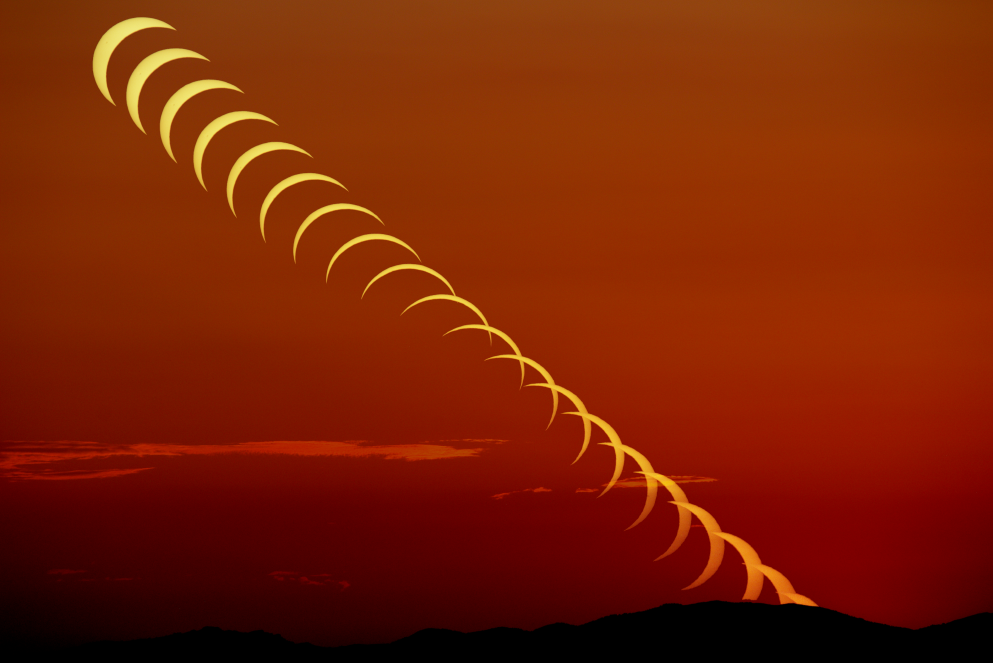
Partial solar eclipse - Aug 12th, 2026 - In the hills close to Nice, France