Cosmic hide-and-seek (chasing invisible asteroids)
Since Siril 1.4, new features have been introduced that make it easier finding invisible solar system objects in your images.
It is in a sense similar to the tutorial on comet stacking, except in the present case, we will use astrometry to find the objects
of interest. This tutorial will take you through the steps to reveal them through stacking.
Preparing the sequence #
The sequence used to illustrate this tutorial was originally shot to capture the famous comet 67P/Churyumov–Gerasimenko , landing site to the ESA Rosetta mission.
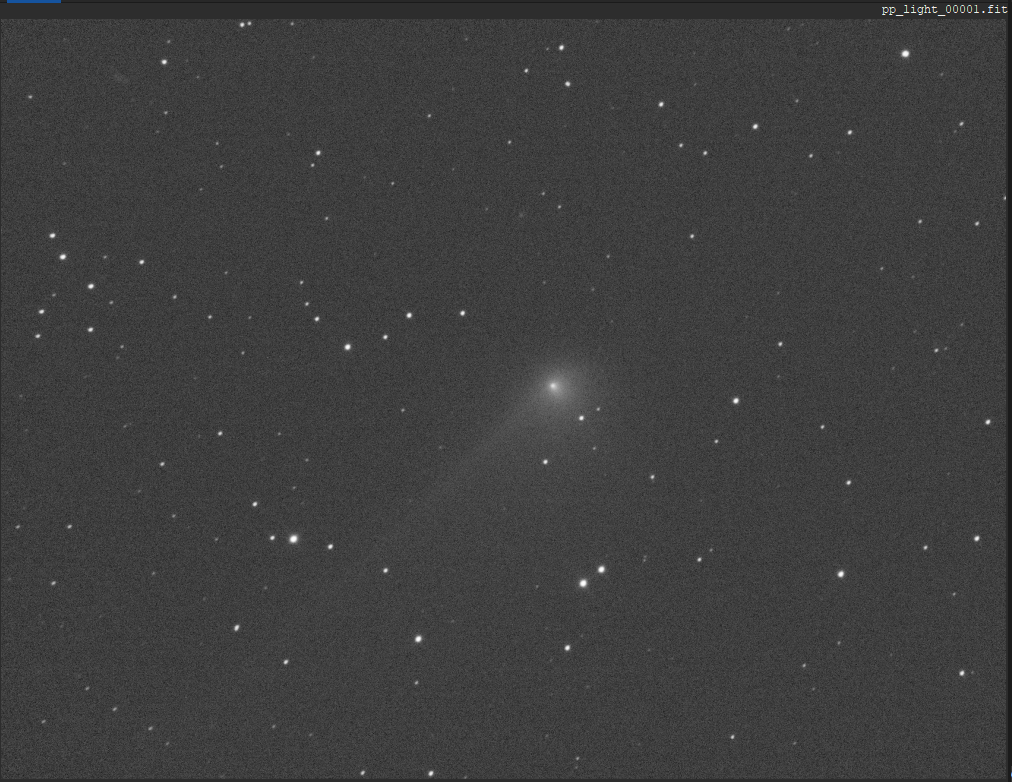
Field showing 67P/T-G, shot with a 400m f/5 newtonian telescope.
Prior to running the steps below, the sequence has been calibrated and is loaded in Siril.
While the comet is obviously visible in the shot, other solar system objects are present. To reveal them, we will first plate-solve the sequence:
- either through GUI, Menu
Tools,AstrometrythenImage platesolver... - or with the command
seqplatesolve
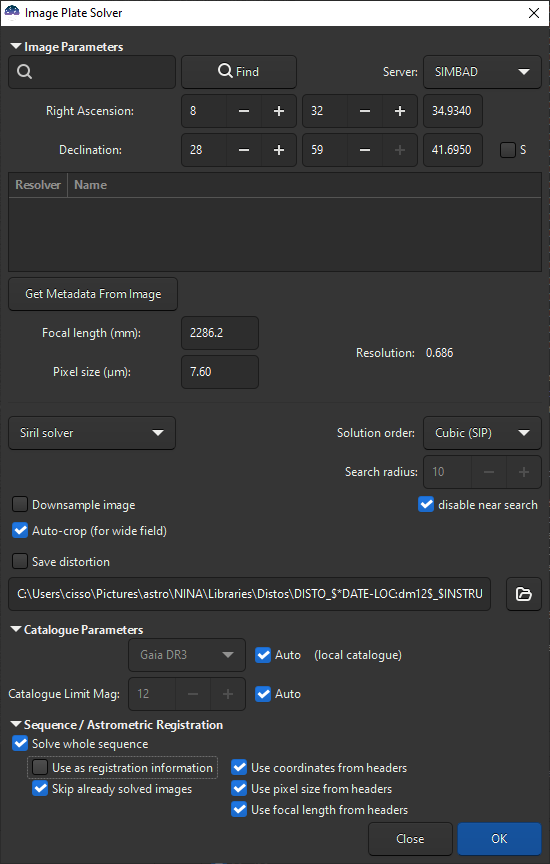
Astrometry dialog to platesolve the sequence.
Note that we have deselected the Use as registration information checkbox in the sequence, it is not absolutely necessary but we will explain why later on.
We do not strictly need to platesolve the whole sequence to find objects of interest, the first image would be enough, but this will prove useful afterwards.
We can then register the sequence with 2-pass option:
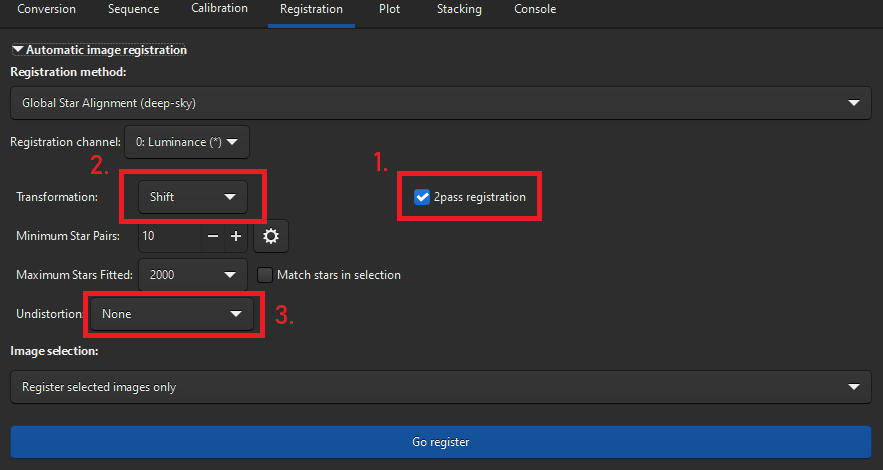
Two-pass registration.
Note the following options:
2pass registrationis selected, meaning we will not actually export the registered images.- we are using
Shifttransformation only. Undistortionis set to None, sowe are not correcting the frames for distortions.
A short explanation about these options. To hunt asteroids, the ideal situation is to avoid any interpolation in the data. So using Shift and no distortion correction enables to store simple translations in the .seq file, that can be used up to the stacking step. This is the reason why we have ot use astrometric registration when platesolving the sequence, as it computes homographies.
Of course, it could be that the data you have at hand parts from this ideal situation (a meridian flip during the session, important distortions and/or significant drift during the session). If that is the case, instead of using 2pass registration, export the registered sequence and use it for the next step (or perform an astrometric registration).
Revealing Solar System Objects #
Now head to the Tools menu, Astrometry and Annotate....
In the Conesearch tab of the dialog, select solsys. This will launch a query to IMCCE server
to find solar system objects in the reference frame.
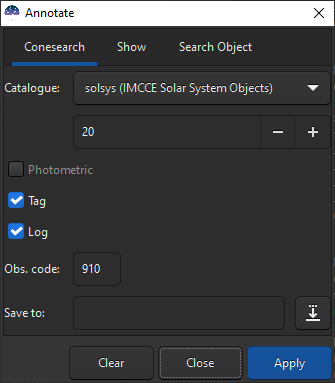
Conesearch dialog for solar system objects.
In the dialog, the observer location is set to 910 which is the observatory code
closest to the location from where this sequence was shot. If you don’t have an IAU observatory nearby, no worries. Just leave this field blank. The conesearch may hand out slightly less accurate results but this first step is really just to spot the objects in view.

Conesearch result on the reference frame.
In the Console, the objects are listed, sorted by ascending magnitude.
log: The IMCCE solar system catalog has been successfully downloaded
log: 67P (Comet), RA: 08 32 35.3, DEC: +28 58 36.9 , mag:8.8
log: 2000 BY4 (MB>Middle), RA: 08 32 45.9, DEC: +28 59 00.5 , mag:17.1
log: 1999 JG84 (MB>Middle), RA: 08 33 03.2, DEC: +29 06 29.4 , mag:17.2
log: Catullus (MB>Outer), RA: 08 31 53.7, DEC: +28 56 52.9 , mag:18.9
log: 2005 ET11 (MB>Inner), RA: 08 32 22.3, DEC: +29 05 17.9 , mag:19.6
log: 5 objects found in the image (mag limit 20.00) using IMCCE solar system catalogue
If we increase the limiting magnitude to 25 in the annotation dialog, we see that the field is even more crowded:
log: The IMCCE solar system catalog has been successfully downloaded
log: 67P (Comet), RA: 08 32 35.3, DEC: +28 58 36.9 , mag:8.8
log: 2000 BY4 (MB>Middle), RA: 08 32 45.9, DEC: +28 59 00.5 , mag:17.1
log: 1999 JG84 (MB>Middle), RA: 08 33 03.2, DEC: +29 06 29.4 , mag:17.2
log: Catullus (MB>Outer), RA: 08 31 53.7, DEC: +28 56 52.9 , mag:18.9
log: 2005 ET11 (MB>Inner), RA: 08 32 22.3, DEC: +29 05 17.9 , mag:19.6
log: 2003 QY20 (MB>Inner), RA: 08 32 36.3, DEC: +28 54 47.6 , mag:20.2
log: 2022 AP34 (MB>Inner), RA: 08 31 41.0, DEC: +29 00 42.2 , mag:21.1
log: 2011 LM36 (MB>Inner), RA: 08 32 32.5, DEC: +28 44 35.2 , mag:21.2
log: 2017 WW81 (MB>Inner), RA: 08 32 44.9, DEC: +29 02 48.0 , mag:21.3
log: 2014 NY54 (MB>Outer), RA: 08 32 54.6, DEC: +29 07 08.7 , mag:21.5
log: 2016 AJ327 (MB>Outer), RA: 08 32 08.8, DEC: +29 02 39.4 , mag:21.8
log: 2009 DX153 (MB>Inner), RA: 08 31 41.5, DEC: +29 03 56.7 , mag:21.8
log: 2013 JM8 (MB>Inner), RA: 08 32 50.7, DEC: +28 48 14.7 , mag:22.0
log: 2015 OL57 (MB>Middle), RA: 08 32 12.2, DEC: +28 57 11.0 , mag:22.7
log: 2014 OY260 (MB>Outer), RA: 08 32 26.7, DEC: +29 09 09.1 , mag:23.9
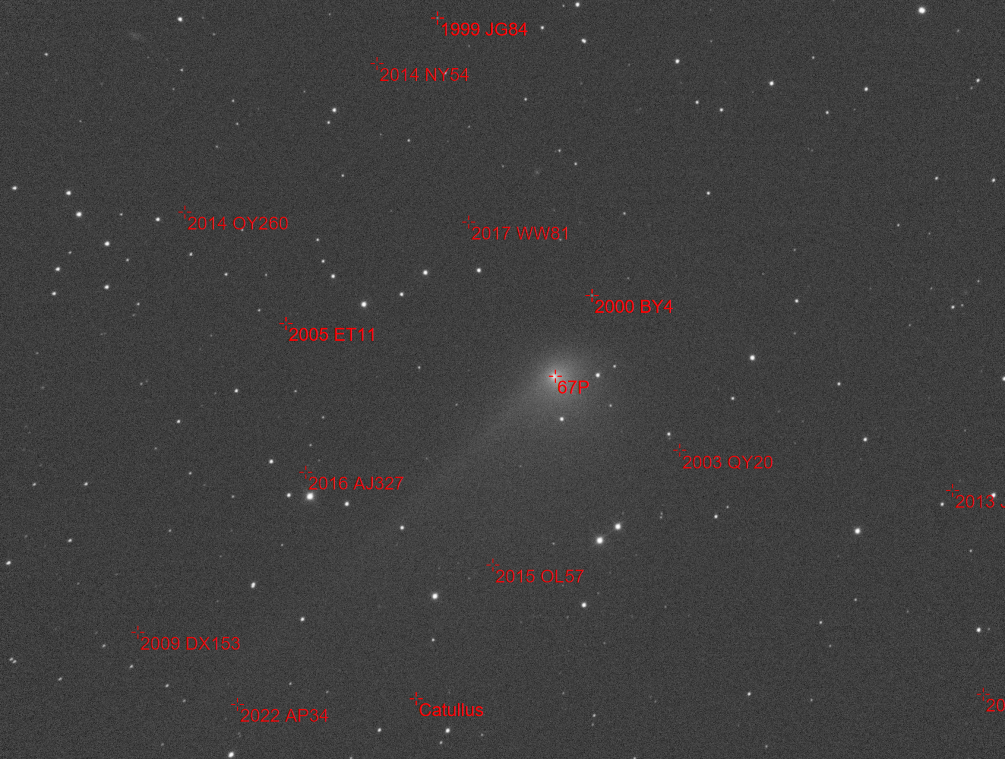
Conesearch result with increased limiting magnitude.
Ok, let’s inspect the annotated objects by increasing magnitude. Obviously, no need to inspect 67P which is very visible. For 2000 BY4, we could have easily confused it with a faint star.
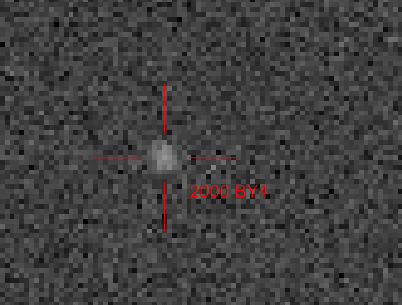
2000 BY4.
Cattullus is a bit harder to spot, but there is still a faint blob visible.
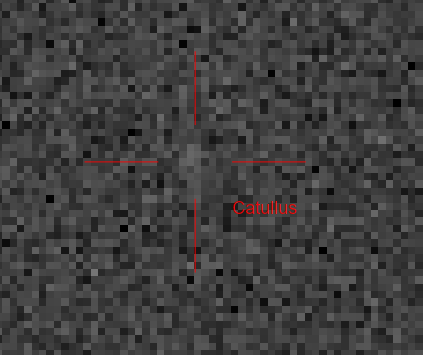
1994 PF20, aka Cattullus.
Now 2005 ET11 is cleary not visible anymore at the location of its annotation.

2005 ET11 location.
We have found our perfect candidate!
Seeing the unseen #
We will now use the object search feature to align on this invisible object.
Reopen the Annotate dialog and go to the Search Object tab. Now type a:2005 ET11 in the search field. The prefix a: indicates we are looking for an asteroid, so that it will query the correct IMCCE miriade service
. More information on the syntax is available in Siril documentation
.
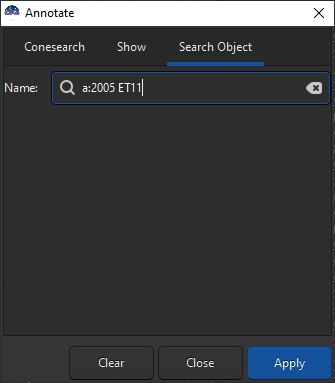
Search Object dialog.
log: Searching for solar system object 2005 ET11 on observation date 2022-01-29T21:26:21.240000
log: at lat: 43.752222, long: 6.916667, alt: 1200.000000
log: Found 254477 2005 ET11 (aka 2005 ET11) at coordinates:  08h32m22.3s, +29°05'17.8"
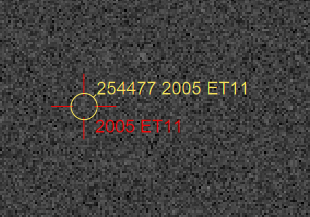
2005 ET11 ephemerid location.
This query is different than the initial conesearch, which identifies all objects in a single frame.
In this case, it queries an ephemerid (so both the position and speed of an object at a given date) that can be used to annotate the object accross multiple frames, provided they are close enough in time.
It is also more accurate as it uses the observer’s position, if any is stored in the frame header, so that the parrallax is correctly accounted for. In the present case, the location from where the shots were taken are close enough to IAU observatory 910 so that parrallax was already correct with the conesearch query.
Also note the different color for the annotation. This means the object in now stored in the User Solar System Catalog
Registration #
Now head to the Registration tab and select Comet/Asteroid registration:
- Open the frame selector and select the first image of the sequence.
- At the center of the annotation draw a small selection box
- Click on
Pick object in #1. As no PSF can be detected, it will use the center of the small selection box. - Select the last frame of the sequence and select again with the help of annotation.
- Click on
Pick object in #2

2005 ET11 blind selection.
As for regular comet registration, the GUI will now display a velocity vector. In the prefix box, we will add 2005ET11_ so as to remember which object we will stack. This will also enable to hunt other objects afterwards.
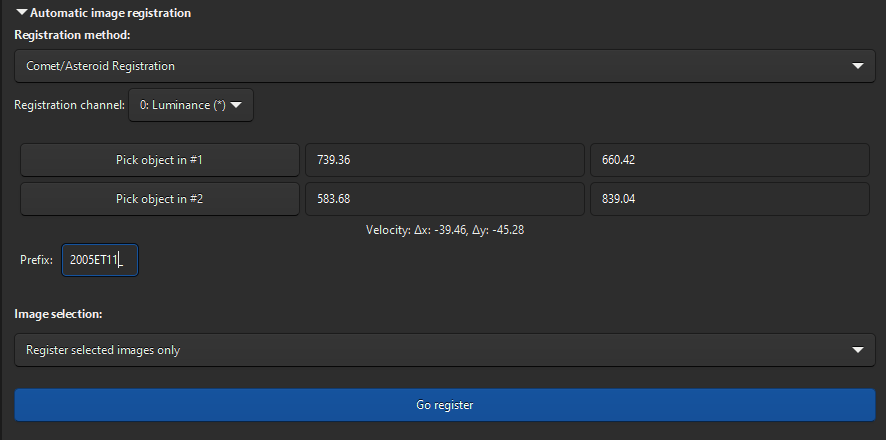
2005 ET11 blind registration ready.
Now click on the Register button to save the offsets. This creates a new sequence with the 2005ET11_ prefix. No new images have been created, just symbolic links, and a new .seq file.
Stacking #
We are now ready to reveal 2005 ET11.
Go to the Stacking tab and use the following options:
- Method to
Average Stackign with Rejection. - Normalisation to
Additive with scaling. - Pixel rejection is up to you, depending on the number of frames.

2005 ET11 blind stacking ready.
Hit the Start stacking and wait for the magic to happen.
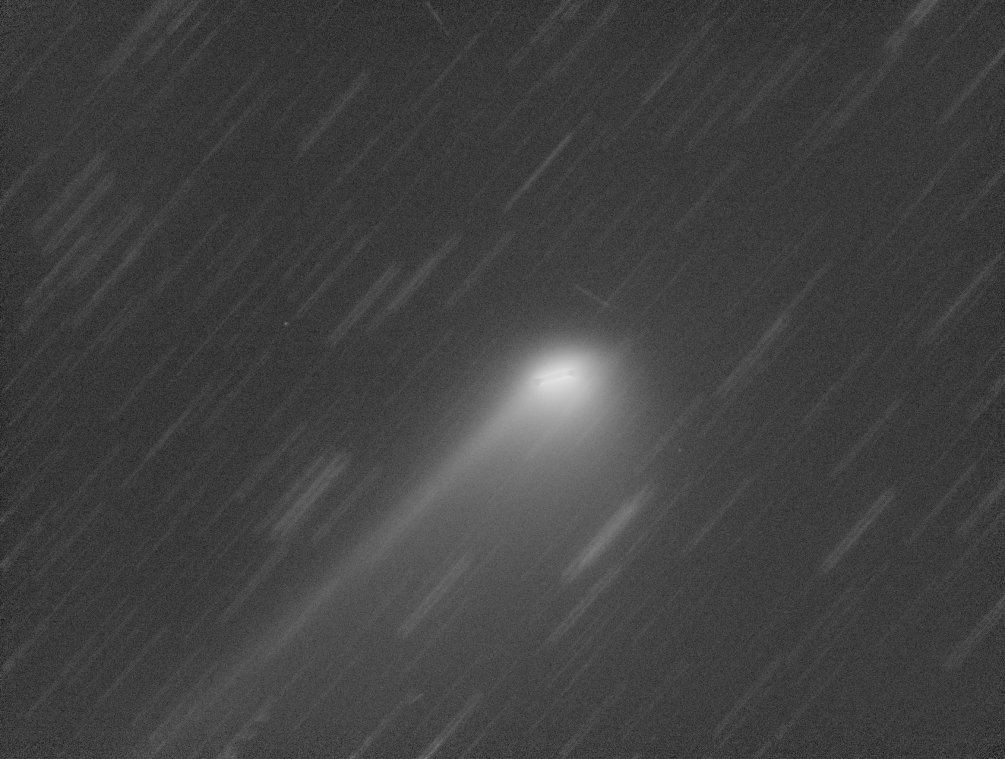
2005 ET11 blind stacking done.
In this image, we of course see 67P. We can also see 2000 BY4, 1999 JG84 and Cattullus traces (they would be a bit more apparent if we were to stack with no rejection).
And we see a small star-shaped dot to the left. If we turn on again annotations, we see it is 2005 ET11.
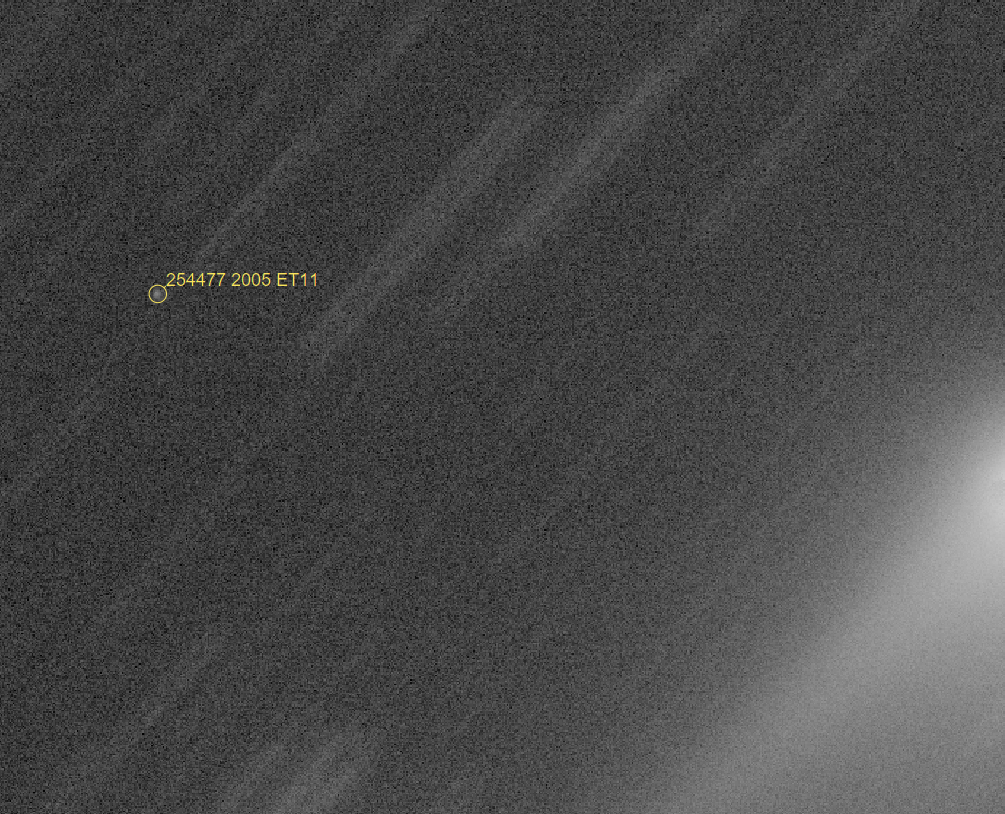
2005 ET11 close-up view (with 67P tail to the right).
A bit of a happy accident, we also see a fainter dot to the right. If we go back to the conesearch annotations with higher limiting magnitude
, we see that 2003 QY20 was also listed in this area, with a magnitude of 20.2.
Launching a Search Object query with a:2003 QY20 reveals it as well.
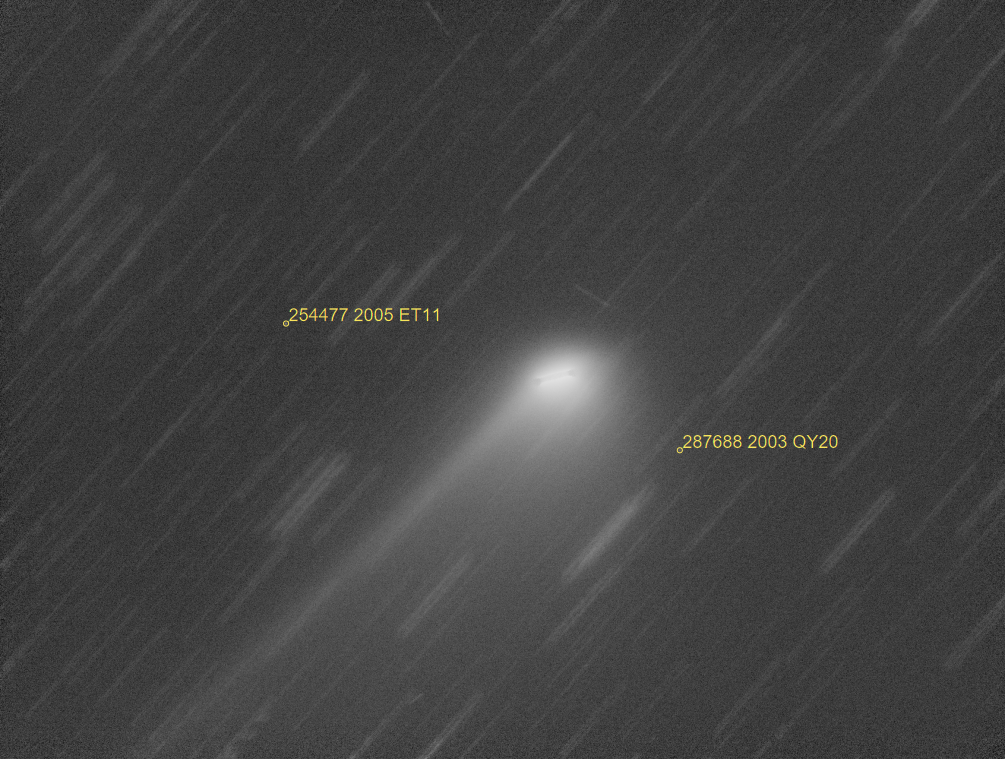
Cosmic serendipity.
So it turns out the 2 objects had the same speed vector at the time of the observation (and the the detection limit of the set-up must be aroung mag 20.). If I was to try with 2022 AP34 (mag 21.1), i.e the next in the list, I would not see anything because it is too faint.
Small tips #
It could be that the object you want to stack does not have ephemerides available on IMCCE server.
If you’ve tried every possible name and still get no response from the server, you can try this.
Open a web browser and type the following address:
https://ssp.imcce.fr/webservices/ssodnet/api/resolver.php?-name=NAMEOFTHEOBJECT&-mime=text
where you have replaced NAMEOFTHEOBJECT by the name correct name, obviously.
For instance, with C/2023%20Q1 (%20 is a space character), you would get something like:
# Flag: 1
# Ticket: 182996012572018110
# Version: 2.1
# id | type | class | name | number | title | aliases | parent | system | ephemeris | physical-ephemeris | physical-models
C/2023_Q1 | Comet |  | C/2023 Q1 |  | C/2023 Q1 (PANSTARRS) | PANSTARRS | Sun | Sun| 0 | 0
The 2 zeros at the end indicate that both physical ephemerides and physical models are not available for this object.
But we won’t take No for an answer. There are other services that provide ephemerides, you could try for instance JPL Small Bodies lookup service: https://ssd.jpl.nasa.gov/tools/sbdb_lookup.html#/
Note the time of observation for the first and last image of your sequence, then send a request to get the position of the object at those 2 dates. Youcan get this with the DATE-OBS key from their headers.
We’ll take as an example 2005 ET11. Once its name is entered in the search page, it shows a result page with
all its orbital elements. Click on Ephemeris in the Related Links section at the top of the page.
Fill in the informations:
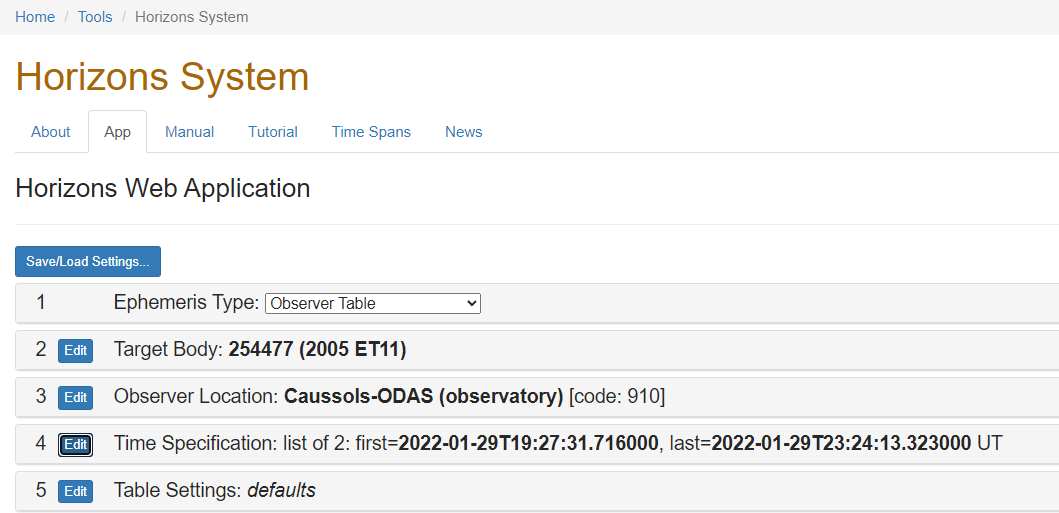
JPL ephemerides query interface.
Enter your observer code if you have one. You can also specify your coordinates on Earth.
Click on Time Specification and enter the date and time of the first and last images as calendar dates :
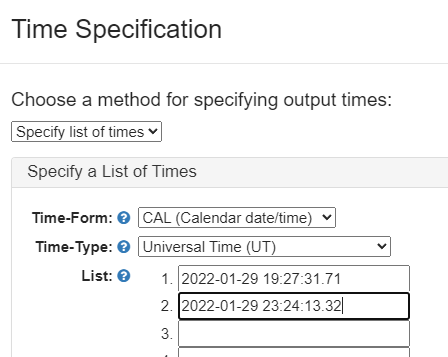
JPL ephemerides time specification.
Once all set, query the server. You should get lots of outputs containing a table like the one below:
*************************************************************************************************************************************************************************************
 Date__(UT)__HR:MN:SC.fff     R.A._____(ICRF)_____DEC    APmag   S-brt             delta      deldot     S-O-T /r     S-T-O  Sky_motion  Sky_mot_PA  RelVel-ANG  Lun_Sky_Brt  sky_SNR
*************************************************************************************************************************************************************************************
$$SOE
 2022-Jan-29 19:27:31.710     08 32 28.51 +29 05 08.1   19.546    n.a.  1.27198304896365   0.6975997  168.2287 /T    5.1322   0.6817666   277.23119   3.8016233         n.a.     n.a.
 2022-Jan-29 23:24:13.320     08 32 16.17 +29 05 27.0   19.549    n.a.  1.27206354731434   1.0246809  168.1183 /T    5.1802   0.6912407   276.26986   5.5008906         n.a.     n.a.
$$EOE
*************************************************************************************************************************************************************************************
Great, we now have the position of the object on those 2 dates.
Go back to Siril, load the sequence and load the first image.
In the Tools Menu, select Astrometry and Annotate...
In the annotation dialog, select Show and Single Coordinates.
Paste the RA and Dec for the first date and tag it, for instance, 2005 ET11 Img 1.
Click Apply.
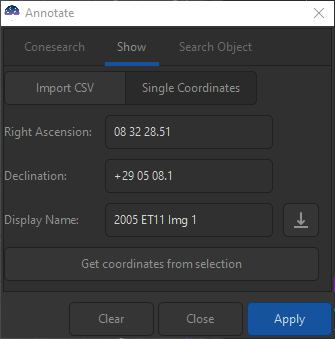
Annotation dialog, Show tab.
These coordinates will now appear on the loaded image. As the object was also found with IMCCE database, it is annotated twice, and at the same location obviously.
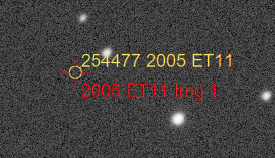
Annotation from IMCCE and JPL calculated position.
Do the same for the second date, but give it another name, say 2005 ET11 Img 2.
You can now follow the instructions in the Registration part of the tutorial. Remember to pick the coordinates associated to the correct image.
Closing remarks #
This tutorial is inspired by a technique used by astronomers to actually hunt for unknown solar system objects (and no, it does not happen as described in the opening scene of “Don’t look up”).
What we have done here is, basically, to give a velocity vector and use it to stack frames blindly. Of course, in the present case, we knew we would find something because we have used the velocity vector of a known object.
To discover unknown objects, we could imagine doing this repeatedly for a series of velocity vectors (varying both in magnitude and direction). If, after stacking, a dot appears, it means that an object travelling with this velocity vector is present in the image. Using this velocity, a preliminary orbit can be found, and further observations can be planned to refine the trajectory calculations. Once confirmed, the object and its orbital elements can be compared against the database maintained by the Minor Planet Center
. If the object is unknown, it will be published in the next MPC bulletin.
A software that can be used to make these thousand of stacks is Tycho Tracker
developped by D. Parrott. A warning still, it needs a solid computing solution (with GPU).
A survey that uses this technique is the MAP project
(page in French, use a translation service), who has successfully discovered hundreds of objects
. One of his founders is G. Attard, the friend of mine who introduced me to this technique and which I warmly thank here. I also thank my good friend S. Debalme with whom I shot this memorable sequence.